


Today we’ll learn how to build and deploy a FastAPI application with a task queue via Celery. We will also create a chat interface using Solara and OpenAI. Then, we’ll deploy it as a single full-stack application using the Ploomber Cloud command-line interface.
The full source code can be found here.
The application is a chat bot that will answer questions about GitHub repositories. We’ll use LlamaIndex which has features for indexing GitHub repositories and chatting with an LLM. This implementation is adapted from an application by Sophia Yang and Mark Scov Madsen..
Here’s a diagram to help understand the overall structure of the application:
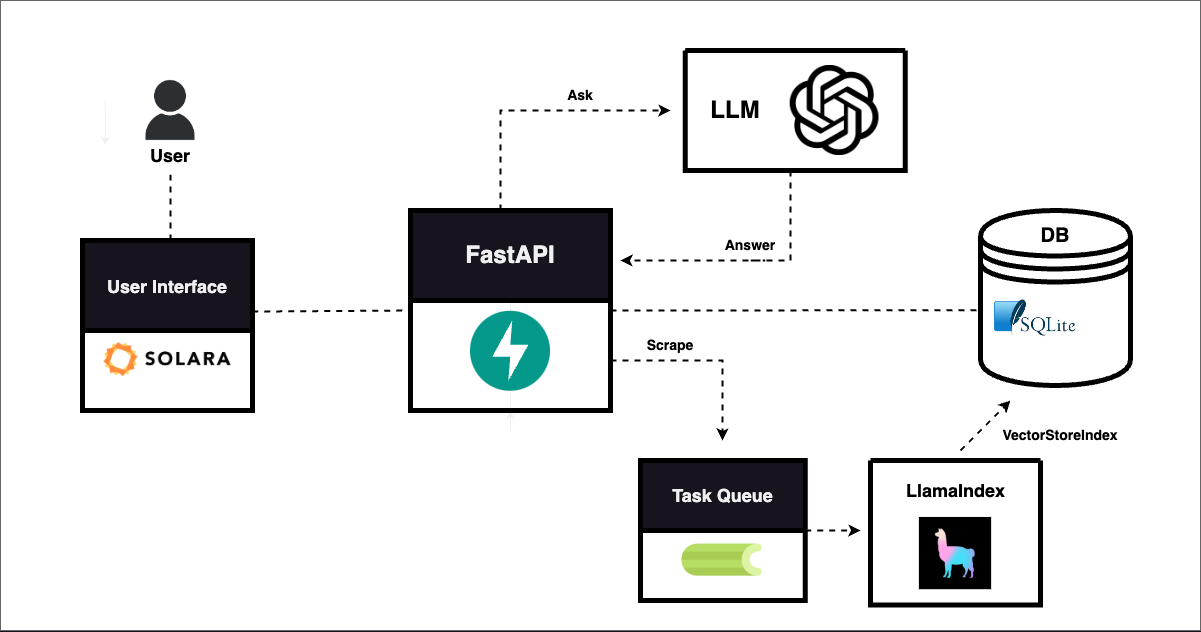
We first get our basic API running. It will have 3 main endpoints:
/scrape which will load a repository from Github/status which will return the loading status of a repository, and/ask which will answer a user’s question about a repository.For more detailed information on setting up an API, see the FastAPI docs.
The API should be defined as app.py and will look something like this:
app = FastAPI()

class Repo(BaseModel):
    owner: str
    name: str
    branch: str

class Question(BaseModel):
    repo_id: str
    question: str

@app.post('/scrape')
def scrape(repo: Repo) -> dict[str, Any]: # maybe change repo from str
    # Enter into DB
    id = f"{repo.owner}-{repo.name}-{repo.branch}"
    status = None
    path = None
    return {'id': id, 'status': status, 'path': path}


@app.get('/status/{repo_id}')
def status(repo_id) -> dict[str, Any]:
    status = None
    return {'id': repo_id, 'status': stat}


@app.post('/ask')
def ask(question: Question) -> dict[str, Any]: # maybe change repo from str
    answer = answer_question(question.repo_id, question.question)
    return {'question': question, 'answer': answer}
We’ll run the API with this command:
uvicorn app:app --reload
Now that our API is working, we’ll implement a task queue which will help us process Github repositories in the background. For more in depth information on using FastAPI + Celery, see this excellent tutorial.
Celery is a task queue with focus on real-time processing, while also supporting task scheduling. But what is a task queue? From Celery’s documentation:
Task queues are used as a mechanism to distribute work across threads or machines. A task queue’s input is a unit of work called a task. Dedicated worker processes constantly monitor task queues for new work to perform.
Using Celery, you can deploy workers which will execute tasks in the background so as to not block your application during long tasks. Later, we will implement a function that indexes Github repositories, which can take up to a few minutes. We’ll use Celery to run that process in the background so that our API can still respond to other requests in the meantime.
Create a file called task.py, which contains a dummy task:
redis_url = os.getenv("REDIS_URL", "redis://localhost:6379")
app = Celery(__name__, broker=redis_url, backend=redis_url)

@app.task
def dummy_task(repo_name):
    time.sleep(5)
    print(f"Done! {repo_name}")
To call this task from the API, we simply import it and run is as a function followed by .delay:
@app.post('/scrape')
def scrape(repo: Repo) -> dict[str, Any]:
  task.dummy_task.delay(repo.id)
  return {"id": repo.id}
To run Celery you first need an instance of Redis running. In another terminal window, install and run Redis with this command (make sure Docker is running):
pip install redis
docker run --rm --name some-redis -p 6379:6379 redis:latest
Now you can run Celery like this:
celery --app=task.app worker --concurrency=1 --loglevel=DEBUG
For more ease, install watchmedo and run it with live reloading:
pip install watchmedo
watchmedo auto-restart --directory=./ --pattern=task.py -- celery --app=task.app worker --concurrency=1 --loglevel=DEBUG
To download and index Github repositories, we use the GithubRepositoryReader from llama_index. This will download a Github repository via username, repository name, and branch. It will then create a VectorStoreIndex which we can pass to the llama_index LLM to answer user questions.
Ensure you have llama_index installed:
pip install llama-index-core llama-index-readers-github llama_index
In task.py, create a new task called download_repo:
RepoModel.update_repo_status(id, "pending")
db_session.commit()

try:
    gh_token = os.getenv("GITHUB_TOKEN")
    client = GithubClient(gh_token)
    loader = GithubRepositoryReader(
            github_client=client,
            owner=owner,
            repo=name,
            use_parser=False,
            verbose=True,
            timeout=None,
            retries=2,
            concurrent_requests=1,
        )
    docs = loader.load_data(branch=branch)
    index = VectorStoreIndex.from_documents(docs)
except Exception as er:
    RepoModel.update_repo_status(id, "failed")
    db_session.commit()
    self.update_state(state='FAILURE', meta={'exc': er})
    raise


if not INDEXES.exists():
    Path.mkdir("indexes", exist_ok=True)

full_path = INDEXES / path
full_path.touch()

with full_path.open("wb") as f:
    pickle.dump(index, f, pickle.HIGHEST_PROTOCOL)

RepoModel.update_repo_status(id, "finished")
db_session.commit()
We’ll call it in /scrape in app.py:
@app.post('/scrape')
def scrape(repo: Repo) -> dict[str, Any]:
    # Enter into DB
    id = f"{repo.owner}-{repo.name}-{repo.branch}"
    status = None
    path = None

    # Check if repo has been entered
    try:
        status = RepoModel.get_repo_status(id)
    except:
        pass

    if status == "pending":
        raise HTTPException(status_code=500, detail="Repo is being parsed.")
    elif status == "finished":
         raise HTTPException(status_code=500, detail="Repo already parsed successfully.")
    elif status == "failed":
        path = RepoModel.get_repo_path(id)
        status = "pending"
    else: # status == None
        path = f"{repo.owner}_{repo.name}_{repo.branch}.pickle"
        status = "pending"
        repoModel = RepoModel(id=id, status=status, path=path)
        db_session.add(repoModel)
        try:
            db_session.commit()
        except Exception as e:
            db_session.rollback()
            raise HTTPException(status_code=500, detail="Error submitting to database.") from e

    # Send download task to celery
    t = task.download_repo.delay(id=id, owner=repo.owner, name=repo.name, branch=repo.branch, path=path)
    return {'id': id, 'status': status, 'path': path}
In /ask, we’ll use the VectorStoreIndex to answer the user’s questions:
@app.post('/ask')
def ask(question: Question) -> dict[str, Any]: # maybe change repo from str
    answer = answer_question(question.repo_id, question.question)
    return {'question': question, 'answer': answer}

def answer_question(repo_id, question):
    try:
        path = INDEXES / RepoModel.get_repo_path(repo_id)
    except Exception as e:
        raise HTTPException(status_code=500, detail="Repo not found.") from e

    if not Path(path).exists():
        raise HTTPException(status_code=500, detail="Could not load index")

    with open(path, "rb") as f:
        index = pickle.load(f)

    chat_engine = index.as_chat_engine(chat_mode="context", verbose=True)

    response = chat_engine.chat(question)

    return response.response
Sometimes the load function from GithubRepositoryReader will fail due to an HTTP Error, JSON parsing error, or another intermediate error. We’ve ran into a fair amount of issues with this tool, but have found the best results with these parameters:
timeout = Noneconcurrent_requests = 2retries = 2All together, it should look like this:
loader = GithubRepositoryReader(
  github_client=client,
  owner=owner,
  repo=name,
  use_parser=False,
  verbose=True,
  timeout=None,
  retries=2,
  concurrent_requests=2,
)
We’ll use Solara for the chat interface. It utilizes Sidebar for the loading functionality and ChatComponents for the chat. View the source code to get the full picture. Here’s a snippet:
with sl.Column():
  sl.Title("Chat with Github")
  with sl.Sidebar():
      sl.HTML(tag="h1", unsafe_innerHTML="Load a Repository", style={"padding-top": "10px", "padding-bottom": "10px", "padding-left": "10px"})

      with sl.Card():
          sl.InputText("Owner", value=owner, on_value=set_owner)
          sl.InputText("Repo", value=repo, on_value=set_repo)
          sl.InputText("Branch", value=branch, on_value=set_branch)

          if error_msg:
              sl.Error(label=f"{error_msg}", icon=True)

          sl.Button("Load", on_click=load_repo, color="primary", style={"width": "100%", "height": "7vh", "margin-bottom": "1vh"})
          sl.Button("Clear", on_click=clear, style={"width": "100%", "margin-bottom": "1vh"})
          sl.Button("Reset DB", on_click=handle_reset, style={"width": "100%"})

      with sl.HBox(align_items="center"):
          sl.HTML(tag="h1", unsafe_innerHTML="Repositories", style={"padding-top": "10px", "padding-bottom": "10px", "padding-left": "10px"})

          sl.Button("Update", on_click=update_statuses, style={"margin-left": "10px", "padding-right": "20px", "right": "20px", "position": "absolute"})
      for this_repo in loaded_repos.value:
          with sl.Card():
              with sl.Columns([7.5, 2.5]):
                  sl.Markdown(this_repo.id)
                  with sl.HBox():
                      sl.Markdown(f"__{this_repo.status}__", style={"color": status_color(this_repo.status)})


  with sl.VBox(classes=["chat-area"]):
      with sl.lab.ChatBox(style={"height": "70vh", "padding-bottom": "20px"}):
          for message in messages:
              with sl.lab.ChatMessage(
                  user=message.role=="user",
                  avatar=sl.Image(f"client/static/{message.role}-logo.png", classes=["avatar"]),
                  avatar_background_color="#ffffff",
                  name=message.role.capitalize(),
                  color="#7baded" if message.role == "user" else "rgba(0,0,0, 0.06)",
                  notch=True,
              ):
                  sl.Markdown(message.content)

      if num_finished < 1:
          sl.Warning("Load a repository to start chatting.")
      if chat_error:
          sl.Error("Error answering your question. Please refresh.")

      sl.lab.ChatInput(send_callback=ask_chatgpt, disabled=disabled)
We can deploy the application using Ploomber Cloud. The Ploomber Cloud command-line interface makes it easy to deploy apps and even has features for secrets and automated deployments. Since this application will contain a Solara frontend and FastAPI + Celery backend, we’ll need to take some extra measures to get it all running in a single container.
This is the file structure of the app:
api/ folder which contains the backend filesclient/ which contains the frontend files.env, requirements.txt, Dockerfile, and start.shCreate a .env file and make sure to include these environment variables:
OPENAI_API_KEY=your_openai_key
GITHUB_TOKEN=your_github_token
API_ROOT="http://0.0.0.0:8765"
To deploy, you need a requirements.txt file. It should look like this:
uvicorn==0.21.1
fastapi==0.95.0
redis==4.5.4
celery==5.2.7
watchdog
python-dotenv==1.0.0
sqlalchemy
llama-index-core
llama-index-readers-github
llama_index
humanize
solara==1.29.1
openai
We’ll deploy this as a docker app, so we need a Dockerfile:
FROM python:3.11

COPY api/ /api/
COPY client/ /client/
COPY start.sh start.sh
COPY requirements.txt requirements.txt
COPY .env .env

RUN apt-get update && apt-get -y install redis-server
RUN pip install -r requirements.txt --no-cache-dir
RUN python api/create_models.py

ENTRYPOINT ["sh", "start.sh", "--port", "80"]
Some notes:
api/ and client/ folderspython api/create_models.pyport 80, so we specify that in ENTRYPOINTENTRYPOINT runs a script that starts each process in a specific sequence. More details to follow:We use this shell script to run FastAPI, Redis, Celery, and Solara concurrently. Importantly, the FastAPI server must be running before Solara, or else Solara will fail. To do this, we make use of sleep. We use the & operator to run multiple commands at once. It looks like this:
#!/bin/bash
sleep 10 && solara run client/main.py --host=0.0.0.0 --port=80 &
(nohup redis-server &
celery --app=api.task.app worker --concurrency=1 --loglevel=DEBUG &
uvicorn api.app:app --host=0.0.0.0 --port=8765)
Now we’re ready to deploy. If you haven’t yet sign up and get an API key.
Ensure you’re in the root project directory and run:
ploomber-cloud init
You should see a ploomber_cloud.json file created. Now deploy:
ploomber-cloud deploy --watch
To verify the Docker build works locally, you can run:
docker build -t api-app .
Followed by:
docker run -dp 127.0.0.1:3000:3000 api-app
Using Docker Desktop, it’s easy to verify that your app is running in a single container.
That’s it! In this tutorial we learned how to:
As always, take note of the small details and tips. Happy coding!
Seamless deployment for data scientists and developers. Ploomber handles infrastructure so you focus on building. Secure and scalable—from personal projects to enterprise apps. Support for Streamlit, Dash, Docker, and AI-powered applications. Because life's too short for deployment headaches.

