Introduction
Previously, we learned how to connect a Shiny application to PostgreSQL.
In this blog, we will do the same for a Dash application using SQLAlchemy, a comprehensive set of tools for working with databases in Python, and deploy the application onto the Ploomber Cloud.
Creating a PostgreSQL Database
If you already have a PostgreSQL database set up, feel free to skip these steps.
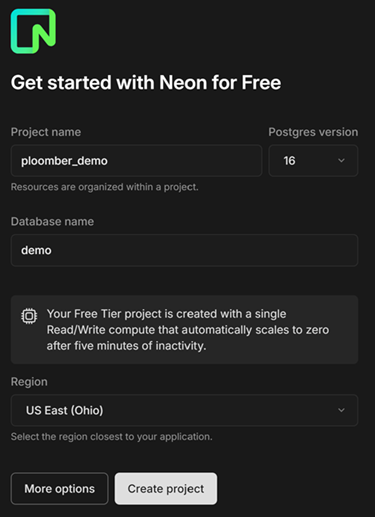
For this blog, we will create a PostgreSQL database using Neon. Neon is a serverless Postgres database platform that allows developers to create a database in just a few clicks. A free tier with 0.5 GB of storage is available. After creating an account, you should be prompted to create a project. Enter the project name, the Postgres version you want, the database name, and your region.
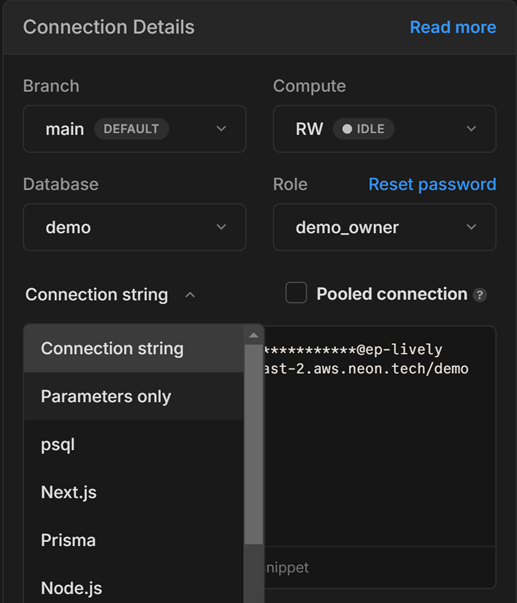
After creating the project, you should be redirected to your project dashboard. Under connection details, switch Connection string to Parameters only. We will need this information to connect to our database later.
Environment setup
Setting up a virtual environment for development is always a good practice. We will create a conda environment and activate it. You can alternatively use venv. In your terminal, execute the following:
conda create --name your_venv python=3.11 --yes
conda deactivate # Only if necessary. Make sure that you are not already in any other environment before activating.
conda activate your_venv
You can verify that you are in the virtual environment by executing which python, which should print out:
/path/to/miniconda3/envs/your_venv/bin/python
Your requirements.txt should contain the following packages:
dash
gunicorn
pandas
psycopg2-binary
python-dotenv
sqlalchemy
In the virtual environment, install all necessary packages
python3 -m pip install -r requirements.txt
Finally, on the Neon dashboard, copy and paste the Parameters only section under connection details to your .env file:
# Do not expose your Neon credentials to the browser

PGHOST='YOUR_HOST'
PGDATABASE='test'
PGUSER='test_owner'
PGPASSWORD='some_password'
This step will set up the proper environment variables for the PostgreSQL connection. Replace the specified fields using the parameters from your unique database.
Uploading Data to Postgres
If there is already data stored in your database, please skip this step.
For this blog, we will be using public student performance data from two Portuguese schools. The dataset contains two csv files, student-mat.csv and student-por.csv, corresponding to students in a math class and a Portuguese class, respectively. The tables share the same features, which include student age, absences, familial circumstances such as parent education level, and other personal information. The dataset is available for download here. I extracted only the necessary data to form student-mat-min.csv and student-por-min.csv. We will be using them to create a basic Dash App.
To upload data to the database we just created, we can use SQLAlchemy and Pandas.
- Create a Python script
upload.py(or any name you prefer).
This file will contain all the code for uploading data to our database. Make sure this file is separate from your Dash app as we do not want to perform any unintended modifications to our database. We will be running this file locally.
- Connect to your PostgreSQL Database
To establish a connection to the database, we can use the create_engine function and pass in the database’s parameters. This creates an Engine object that maintains a pool of connections available for the application to talk to the database. In your upload.py file, include the following code. Please note that you do not need to load_dotenv in any files you upload to our server, as you can define them as secret.
import pandas as pd
from sqlalchemy import URL, create_engine
import os
from dotenv import load_dotenv

# Load environment variables
load_dotenv(".env")

connection_string = URL.create(
  'postgresql',
  username=os.getenv("PGUSER"), # You can alternatively paste your information directly, but you shouldn't do so in any of your uploaded files as your secrets will be exposed
  password=os.getenv("PGPASSWORD"),
  host=os.getenv("PGHOST"),
  database=os.getenv("PGDATABASE")
)

engine = create_engine(connection_string)
- Read the data and write to the database
In upload.py, add code to read the data you want to upload. Then, use the to_sql function to upload a table to your database. Here, we read in two dataframes and uploaded two tables onto our database called math and portuguese.
csv_files = {
    "math": "data/student-mat-min.csv",
    "portuguese": "data/student-por-min.csv"
}

for db_name, db_file in csv_files.items():
    df = pd.read_csv(db_file, sep = ",") # Load data from csv file
    df.to_sql(db_name, engine, if_exists='replace', index=False) # Upload data to database
    print(f"Successfully uploaded database {db_name}")

engine.dispose() # Good practice: close the connection to your database once you are done interacting with it
Running python upload.py should successfully upload the two datasets to your database.
Now that the data is stored in the database, we can execute custom SQL queries in our Python script using pd.read_sql!
query = "SELECT * FROM math"
df = pd.read_sql(query, conn)
Connecting your app to the database
After we have our database setup, we can now use it alongside our Dash app! To do this, first establish a connection with the database as we have done above. In your app.py file, add the following code.
from dash import Dash, html, dcc, callback, Output, Input
import plotly.express as px
import pandas as pd
from sqlalchemy import URL, create_engine
import os
from dotenv import load_dotenv # Remove if not testing locally
# Load environment variables
load_dotenv(".env") # Remove if not testing locally

# Connect to PostgreSQL database
connection_string = URL.create(
  'postgresql',
  username=os.getenv("PGUSER"),
  password=os.getenv("PGPASSWORD"),
  host=os.getenv("PGHOST"),
  database=os.getenv("PGDATABASE")
)
Next, we have some standard Dash code to create an interactive UI. Since we integrated the app with our Postgres database, we can define a dropdown menu that allows the user to select which table in the database they want to visualize.
DB_LIST = ['math', 'portuguese']

app = Dash(__name__)
server = app.server

app.title = "Student Data - Ploomber Cloud Dash Application with PostgreSQL"

app.layout = html.Div(
    [
        html.H1(children="Dash Application with PostgreSQL Demo", style={"textAlign": "center"}),
        html.Div(
            [
                html.Div([
                    html.P(children="Database selection:"),
                    dcc.Dropdown(
                        DB_LIST, "math", id="db-selection",
                        className="drop-list"
                    )
                ], className="drop-wrapper"),
                html.Div([
                    html.P(children="Select x, y axis and facet for scatter plot:"),
                    dcc.Dropdown(id="scatter-selection-x", className="drop-list"),
                    dcc.Dropdown(id="scatter-selection-y", className="drop-list"),
                    dcc.Dropdown(id="scatter-selection-facet", className="drop-list")
                ], className="drop-wrapper"),
                html.Div([
                    html.P(children="Select x axis for bar chart:"),
                    dcc.Dropdown(id="bar-selection-x", className="drop-list")
                ], className="drop-wrapper")
            ]
        ),
        dcc.Graph(id="graph-content"),
        dcc.Graph(id="graph-bar")
    ]
)
In a new folder assets, create style.css and add some basic formatting
.drop-wrapper {
    display: flex;
}

.drop-list {
    margin-left: 15px;
    width: 150px;
    white-space: pre;
    text-overflow: ellipsis;
    margin-top: 5px;
}
Finally, we write our update functions for the dropdown lists and graphs. We use callbacks: functions that are automatically called by Dash whenever an input component’s property changes. Every time the user selects a different table in the database, we query from the new table, which then changes the available options in the UI. In each plot, we use an SQL query to fetch data from the database. This means that we can write any query we want and display the result in any graph we need. For more details on callbacks, check out this tutorial.
@callback(
    [
        Output("scatter-selection-x", "options"),
        Output("scatter-selection-y", "options"),
        Output("scatter-selection-facet", "options"),
        Output("bar-selection-x", "options"),
        Output("scatter-selection-x", "value"),
        Output("scatter-selection-y", "value"),
        Output("scatter-selection-facet", "value"),
        Output("bar-selection-x", "value"),
    ],
    Input("db-selection", "value")
)
def update_dropdown(value):
    """Updates dropdown list based on selected db."""
    e = create_engine(connection_string, pool_size=10, max_overflow=20)
    query = f"SELECT * FROM {value}"
    with e.connect() as conn:
        df = pd.read_sql(query, conn)
        conn.close()
    cols = list(df.columns)
    return cols[4:9], cols[9:], cols[1:4], cols[1:], cols[4], cols[9], cols[1], cols[1]

@callback(
    Output("graph-content", "figure"),
    [
        Input("db-selection", "value"),
        Input("scatter-selection-x", "value"),
        Input("scatter-selection-y", "value"),
        Input("scatter-selection-facet", "value"),
    ]
)
def update_graph(db_name, val_x, val_y, val_facet):
    """Updates scatter plot based on selected x and y axis."""
    e = create_engine(connection_string, pool_size=10, max_overflow=20)
    query = f"SELECT * FROM {db_name}"
    with e.connect() as conn:
        df = pd.read_sql(query, conn)
        conn.close()
    title = f"Distribution of student {val_y} based on {val_x}, separated by student {val_facet}"
    return px.scatter(df, x=val_x, y=val_y, facet_col=val_facet, title=title)

@callback(
    Output("graph-bar", "figure"),
    [
        Input("db-selection", "value"),
        Input("bar-selection-x", "value"),
    ]
)
def update_bar(db_name, val_x):
    e = create_engine(connection_string, pool_size=10, max_overflow=20)
    query = f"SELECT {val_x}, COUNT({val_x}) FROM {db_name} GROUP BY {val_x}"
    with e.connect() as conn:
        df = pd.read_sql(query, conn)
        conn.close()
    title =f"Number of students based on {val_x}"
    return px.bar(df, x=val_x, y="count", title=title)

if __name__ == '__main__':
   app.run_server(debug=False, port=8000) # It's always good practice to specify the port, even though there is a default
To test the app locally, run python app.py. You should be able to access the content by visiting 127.0.0.1:8000. A screenshot of the Dash app is shown here. To run it yourself, clone the app from this repository.

Deploying Dash App to Ploomber Cloud
Command-line interface
You can choose to use our command-line interface to deploy your app. The following files will be necessary:
- .env
- app.py
- assets/style.css
- requirements.txt
Ensure that the .env file contains your Postgres database information, and the CLI will automatically store them as secrets upon deployment.
To deploy, set your API key using ploomber-cloud key YOURKEY (how to find it), then run ploomber-cloud init to initialize the new app and finally ploomber-cloud deploy. For more details please check our guide.
GUI
We will use the Dash option to deploy to Ploomber Cloud. First, create a Ploomber Cloud account if you have not done so. To deploy the app, we upload a .zip file containing the following files:
- app.py
- assets/style.css
- requirements.txt
Now that you have your zip file prepared and you are logged into Ploomber Cloud, you should see this screen:
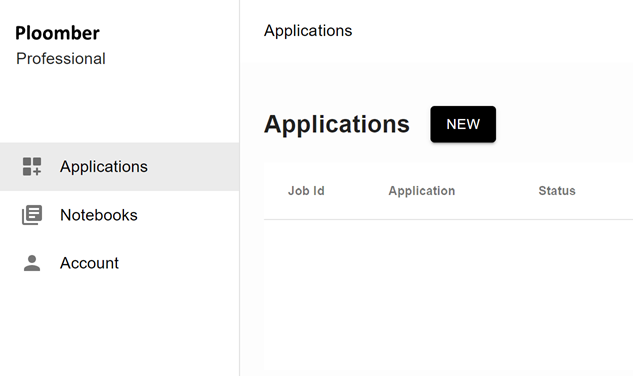
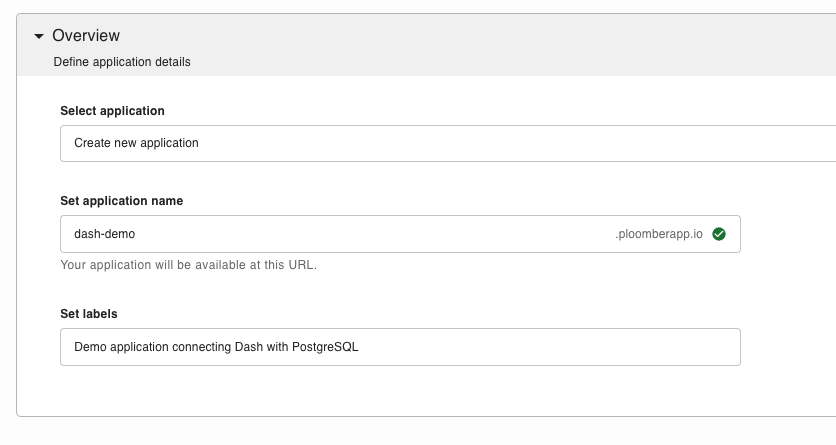
Click on NEW and under Overview, give your app a custom name and description.
Select Dash under Framework and upload your zip file.


In the secret section, use the information from the Parameters only section under connection details from your Neon dashboard. Example:

They will be used by app.py as your environment variables
Next, you can optionally customize the hardware, such as the amount of RAM you want to run your application on. You could also enable password protection.
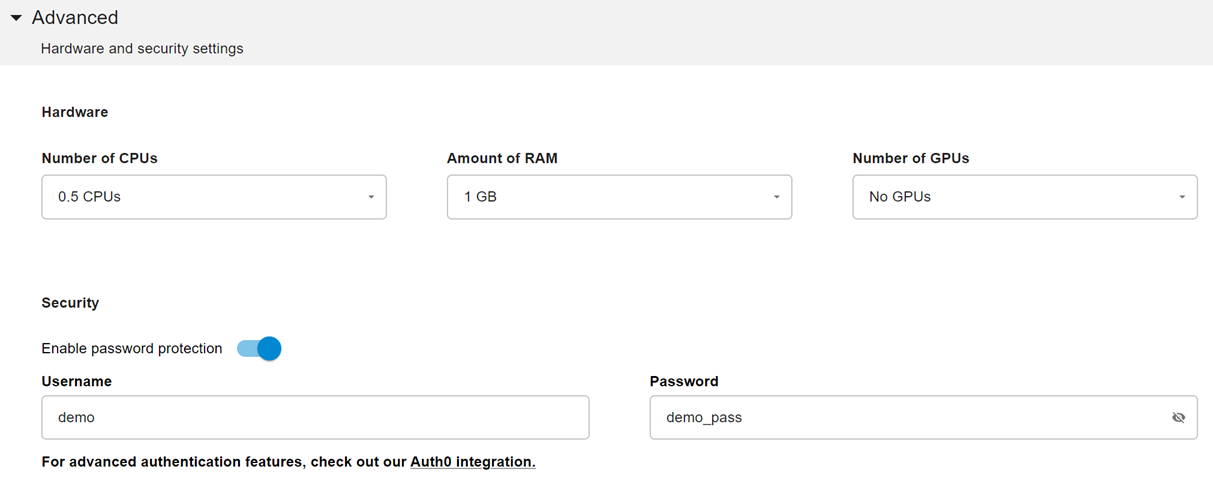
After you are done customizing, click create and the website will automatically deploy. Once it is deployed, you will be able to access the URL.
And there we go! We have not connected our Dash application to a PostgreSQL database deployed on the Ploomber Cloud.

