


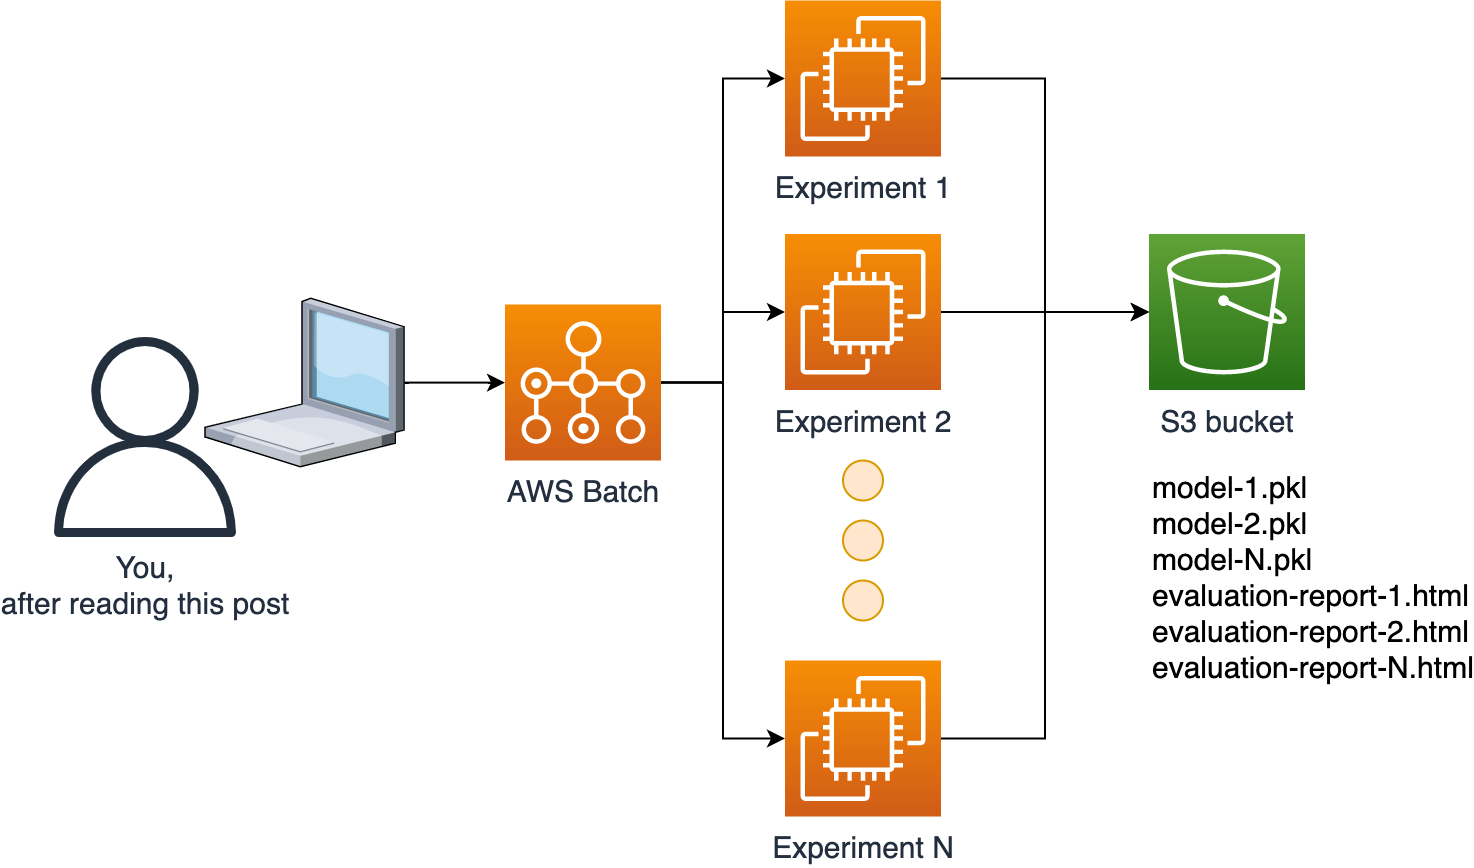
In this series of tutorials, we’ll show you how to deploy a Data Science platform with AWS and open-source software. By the end of the series, you’ll be able to submit computational jobs to AWS scalable infrastructure with a single command.
To implement our platform, we’ll be using several AWS services. However, the central one is AWS Batch.
AWS Batch is a managed service for computational jobs. It takes care of keeping a queue of jobs, spinning up EC2 instances, running our code and shutting down the instances. It scales up and down depending on how many jobs we submit. It’s a very convenient service that allows us to execute our code in a scalable fashion and to request custom resources for compute-intensive jobs (e.g., instances with many CPUs and large memory) without requiring us to maintain a cluster (no need to use Kubernetes!).
Let’s get started!
aws CLI:The only requirement for this tutorial is to have the AWS command-line interface installed (and access keys with enough permissions to use the tool). Follow the installation instructions. If you have issues, ask for help in our Slack.
Verify your installation (ensure you’re running version 2):
aws --version
Output:
aws-cli/2.7.22 Python/3.10.6 Darwin/20.6.0 source/x86_64 prompt/off
Then authenticate with your access keys:
aws configure
We need to create a VPC (Virtual Private Cloud) for the EC2 instances that will run our tasks, this section has all the commands you need for configuring the VPC.
Note that all AWS accounts come with a default VPC. If you want to use that one, ensure you have the subnet IDs and security group IDs you want to use and skip this section.
If you neep help, feel free to ask us anything on Slack.
Let’s create a new VPC, and retrieve the VPC ID:
aws ec2 create-vpc --cidr-block 10.0.0.0/16 \
    --tag-specification \
    'ResourceType=vpc,Tags=[{Key=Name,Value=ploomber-vpc}]' \
    --query 'Vpc.VpcId' --output text
Output:
vpc-002e312f423bf9de7
Let’s assign the ID to a variable so we can re-use it (replace the ID with yours):
VPC_ID=vpc-002e312f423bf9de7
Now, let’s create a subnet and get the subnet ID:
aws ec2 create-subnet \
    --vpc-id $VPC_ID \
    --cidr-block 10.0.0.0/24 \
    --tag-specifications \
    'ResourceType=subnet,Tags=[{Key=Name,Value=ploomber-subnet}]' \
    --query Subnet.SubnetId --output text
Output:
subnet-02d764f6be274b5f5
And assign the ID to a variable (replace the ID with yours):
SUBNET_ID=subnet-02d764f6be274b5f5
We need to modify the subnet’s configuration so each instance gets a public IP:
aws ec2 modify-subnet-attribute \
    --subnet-id $SUBNET_ID \
    --map-public-ip-on-launch
Now, let’s configure internet access:
aws ec2 create-internet-gateway \
    --query 'InternetGateway.InternetGatewayId' \
    --output text
Output:
igw-04dcfb49b85b99242
Assign the gateway ID to the following variable (replace the ID with yours):
GATEWAY_ID=igw-04dcfb49b85b99242
Let’s attach the internet gateway to our VPC:
aws ec2 attach-internet-gateway \
    --internet-gateway-id $GATEWAY_ID \
    --vpc-id $VPC_ID
This documentation explains in more detail the commands above.
Note that allowing internet access to your instances simplifies the networking setup. However, if you don’t want the EC2 instances to have a public IP, you can configure a NAT gateway.
Let’s now finish configuring the subnet by adding a route table:
aws ec2 create-route-table --vpc-id $VPC_ID \
    --query RouteTable.RouteTableId \
    --output text
Output:
rtb-004ff91f0640231ac
Assign the route table ID (replace the ID with yours):
ROUTE_TABLE_ID=rtb-004ff91f0640231ac
Let’s add a route associated with our internet gateway:
aws ec2 create-route \
    --route-table-id $ROUTE_TABLE_ID \
    --destination-cidr-block 0.0.0.0/0 \
    --gateway-id $GATEWAY_ID
Output:
{
    "Return": true
}
And associate the table to the subnet:
aws ec2 associate-route-table \
    --subnet-id $SUBNET_ID \
    --route-table-id $ROUTE_TABLE_ID
Output:
{
    "AssociationId": "rtbassoc-0867de83ce83d9517",
    "AssociationState": {
        "State": "associated"
    }
}
Finally, create a security group in our VPC:
aws ec2 create-security-group --group-name ploomber-security-group \
    --description "Ploomber security group" \
    --vpc-id $VPC_ID \
    --query 'GroupId' \
    --output text
Output:
sg-0647a6d9d5ada71cb
And assign the security ID (replace the ID with yours):
GROUP_ID=sg-0647a6d9d5ada71cb
We now need to create a role to allow AWS Batch to call ECS (another AWS service).
Download the configuration file:
curl -O https://raw.githubusercontent.com/ploomber/posts/master/ds-platform-part-i/ecs-instance-role.json
Output:
  % Total    % Received % Xferd  Average Speed   Time    Time     Time  Current
                                 Dload  Upload   Total   Spent    Left  Speed
100   237  100   237    0     0    790      0 --:--:-- --:--:-- --:--:--   790
Create role:
aws iam create-role \
    --role-name ploomber-ecs-instance-role \
    --assume-role-policy-document file://ecs-instance-role.json
Output:
{
    "Role": {
        "Path": "/",
        "RoleName": "ploomber-ecs-instance-role",
        "RoleId": "AROAWJXVIM6EHBLLORAL3",
        "Arn": "arn:aws:iam::0123456789:role/ploomber-ecs-instance-role",
        "CreateDate": "2022-10-05T18:09:33+00:00",
        "AssumeRolePolicyDocument": {
            "Version": "2012-10-17",
            "Statement": [
                {
                    "Effect": "Allow",
                    "Principal": {
                        "Service": "ec2.amazonaws.com"
                    },
                    "Action": "sts:AssumeRole"
                }
            ]
        }
    }
}
aws iam create-instance-profile --instance-profile-name ploomber-ecs-instance-role
Output:
{
    "InstanceProfile": {
        "Path": "/",
        "InstanceProfileName": "ploomber-ecs-instance-role",
        "InstanceProfileId": "AIPAWJXVIM6EELBPRBXBZ",
        "Arn": "arn:aws:iam::0123456789:instance-profile/ploomber-ecs-instance-role",
        "CreateDate": "2022-10-05T18:09:39+00:00",
        "Roles": []
    }
}
aws iam add-role-to-instance-profile \
    --role-name ploomber-ecs-instance-role \
    --instance-profile-name ploomber-ecs-instance-role
aws iam attach-role-policy \
    --policy-arn arn:aws:iam::aws:policy/service-role/AmazonEC2ContainerServiceforEC2Role \
    --role-name ploomber-ecs-instance-role
With networking and permissions configured, we’re now ready to configure the compute environment!
In AWS Batch, a compute environment determines which instance types to use for our jobs.
We created a simple script to generate your configuration file:
curl -O https://raw.githubusercontent.com/ploomber/posts/master/ds-platform-part-i/gen-compute-env.py
curl -O https://raw.githubusercontent.com/ploomber/posts/master/ds-platform-part-i/compute-env.json
curl -O https://raw.githubusercontent.com/ploomber/posts/master/ds-platform-part-i/my-compute-env.json
Output:
  % Total    % Received % Xferd  Average Speed   Time    Time     Time  Current
                                 Dload  Upload   Total   Spent    Left  Speed
100   527  100   527    0     0   3634      0 --:--:-- --:--:-- --:--:--  3634
  % Total    % Received % Xferd  Average Speed   Time    Time     Time  Current
                                 Dload  Upload   Total   Spent    Left  Speed
100   708  100   708    0     0   2583      0 --:--:-- --:--:-- --:--:--  2583
  % Total    % Received % Xferd  Average Speed   Time    Time     Time  Current
                                 Dload  Upload   Total   Spent    Left  Speed
100   475  100   475    0     0   2294      0 --:--:-- --:--:-- --:--:--  2283
Run the script and pass the subnet and security group IDs:
python3 gen-compute-env.py $SUBNET_ID $GROUP_ID
Output:
Config file stored at: my-compute-env.json
You may also edit the my-compute-env.json file and put your subnet IDs in the subnets list, and your security group IDs in the securityGroupIds list. If you need more customization for your compute environment, join our Slack and we’ll help you.
Create the compute environment:
aws batch create-compute-environment \
    --cli-input-json file://my-compute-env.json
Output:
{
    "computeEnvironmentName": "ploomber-batch-computer-environment",
    "computeEnvironmentArn": "arn:aws:batch:us-east-1:0123456789:compute-environment/ploomber-batch-computer-environment"
}
To submit jobs, we need to create a job queue. The queue will receive job requests and route them to the relevant compute environment.
Note: give it a few seconds before running the next command, as the compute environment might take a bit to be created.
Download file:
curl -O https://raw.githubusercontent.com/ploomber/posts/master/ds-platform-part-i/queue.json
Output:
  % Total    % Received % Xferd  Average Speed   Time    Time     Time  Current
                                 Dload  Upload   Total   Spent    Left  Speed
100   246  100   246    0     0   1194      0 --:--:-- --:--:-- --:--:--  1194
Create a job queue:
aws batch create-job-queue --cli-input-json file://queue.json
Output:
{
    "jobQueueName": "ploomber-batch-queue",
    "jobQueueArn": "arn:aws:batch:us-east-1:0123456789:job-queue/ploomber-batch-queue"
}
Let’s test that everything is working!
We define an example job that waits for a few seconds and finishes:
aws batch register-job-definition \
    --job-definition-name my-sample-job-def \
    --type container \
    --container-properties \
    '{ "image": "busybox", "vcpus": 1, "memory": 128, "command": [ "sleep", "3"]}'
Output:
{
    "jobDefinitionName": "my-sample-job-def",
    "jobDefinitionArn": "arn:aws:batch:us-east-1:0123456789:job-definition/my-sample-job-def:12",
    "revision": 12
}
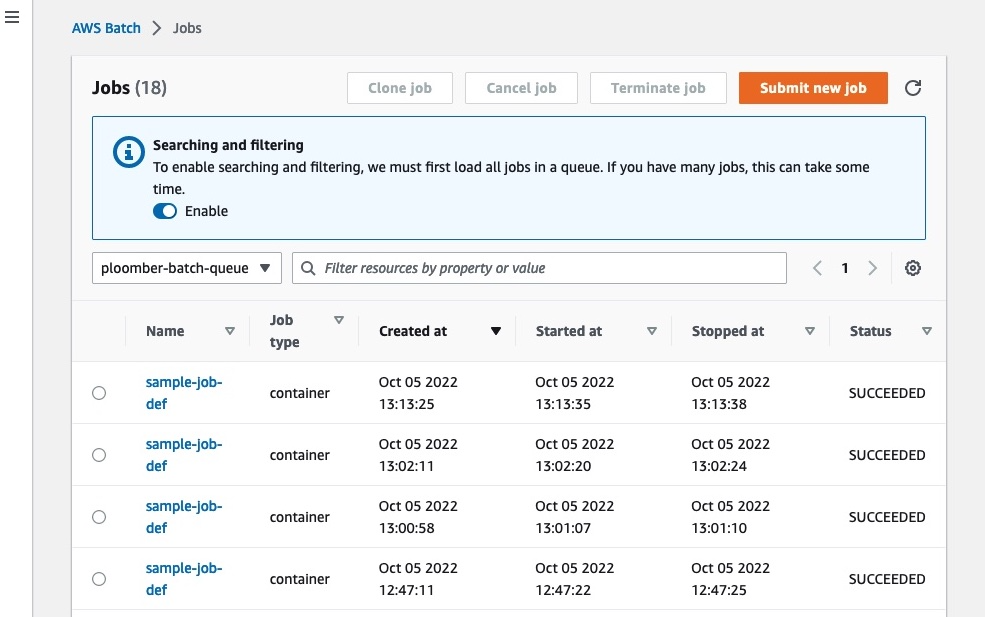
Let’s submit a job to the queue:
aws batch submit-job \
    --job-name sample-job-def \
    --job-queue ploomber-batch-queue \
    --job-definition my-sample-job-def \
    --query jobId \
    --output text
Output:
b603179d-c940-4b02-b38f-fc1bc8f0818e
Let’s ensure the job is executed successfully. Copy the jobId printed when executing the command and pass it to the following command:
# replace with your job id
JOB_ID=b603179d-c940-4b02-b38f-fc1bc8f0818e

aws batch describe-jobs \
    --jobs $JOB_ID \
    --query 'jobs[0].status' \
    --output text
Output:
SUCCEEDED
The first time you run the above command, you’ll most likely see: RUNNABLE, this is normal.
AWS Batch spins up new EC2 machines and shut them down after your jobs are done. This is great because it’ll prevent idling machines that keep billing. However, since new machines spin up every time, this introduces some startup time overhead. Wait for a minute or so and run the command again, you should see STARTING, RUNNING, and SUCCEEDED shortly.
If the job is still stuck in RUNNABLE status after more than a few minutes, ask for help in our community.
In this blog post, we configured AWS Batch so we can submit computational jobs on demand. There’s no need to maintain a cluster or manually spin up and shut down EC2 instances. You’re only billed for the jobs you submit. Furthermore, AWS Batch is highly scalable, so you can submit as many jobs as you want!
In the next post, we’ll show you how to submit a custom container job to AWS Batch, and configure an S3 bucket to read input data and write results.
If you want to be the first to know when the second part comes out; follow us on Twitter, LinkedIn, or subscribe to our newsletter!
There’s no billing for using AWS Batch apart from EC2 usage. However, if you want to clean up your environment, follow these steps.
Disable the AWS Batch queue and compute environments:
aws batch update-job-queue --job-queue ploomber-batch-queue --state DISABLED
Output:
{
    "jobQueueName": "ploomber-batch-queue",
    "jobQueueArn": "arn:aws:batch:us-east-1:0123456789:job-queue/ploomber-batch-queue"
}
aws batch update-compute-environment --compute-environment ploomber-batch-computer-environment --state DISABLED
Output:
{
    "computeEnvironmentName": "ploomber-batch-computer-environment",
    "computeEnvironmentArn": "arn:aws:batch:us-east-1:0123456789:compute-environment/ploomber-batch-computer-environment"
}
You’ll need to wait 1-2 minutes for the queue and the compute environment to appear as DISABLED.
Delete the queue and the compute environment:
aws batch delete-job-queue --job-queue ploomber-batch-queue
aws batch delete-compute-environment \
    --compute-environment ploomber-batch-computer-environment
Delete the VPC and its components:
aws ec2 delete-subnet --subnet-id $SUBNET_ID
aws ec2 delete-route-table --route-table-id $ROUTE_TABLE_ID
aws ec2 delete-security-group --group-id $GROUP_ID
aws ec2 detach-internet-gateway \
    --vpc-id $VPC_ID \
    --internet-gateway-id $GATEWAY_ID
aws ec2 delete-internet-gateway \
    --internet-gateway-id $GATEWAY_ID
aws ec2 delete-vpc --vpc-id $VPC_ID
Delete IAM role:
aws iam remove-role-from-instance-profile --instance-profile-name \
    ploomber-ecs-instance-role \
    --role-name ploomber-ecs-instance-role

aws iam delete-instance-profile --instance-profile-name ploomber-ecs-instance-role

aws iam detach-role-policy --role-name ploomber-ecs-instance-role \
    --policy-arn arn:aws:iam::aws:policy/service-role/AmazonEC2ContainerServiceforEC2Role

aws iam delete-role --role-name ploomber-ecs-instance-role
Seamless deployment for data scientists and developers. Ploomber handles infrastructure so you focus on building. Secure and scalable—from personal projects to enterprise apps. Support for Streamlit, Dash, Docker, and AI-powered applications. Because life's too short for deployment headaches.

