


In our previous post, we configured Amazon ECR to push a Docker image to AWS and configured an S3 bucket to write the output of our Data Science experiments.
In this final post, we’ll show you how to use Ploomber and Soopervisor to create grids of experiments that you can run in parallel on AWS Batch, and how to request resources dynamically (CPUs, RAM, and GPUs).
aws CLIWe’ll be using the aws CLI again to configure the infrastructure, so ensure you’re authenticated and have enough permissions:
aws configure
We’ll be using Docker for this part, so ensure it’s up and running:
docker run hello-world
First, let’s create another ECR repository to host our Docker image:
# set this to the region you want to use
AWS_REGION=us-east-1
aws ecr create-repository \
    --repository-name ploomber-project-repository-grid \
    --query repository.repositoryUri \
    --region $AWS_REGION \
    --output text
Output:
0123456789.dkr.ecr.us-east-1.amazonaws.com/ploomber-project-repository-grid
Assign the REPOSITORY variable to the output of the previous command:
REPOSITORY=0123456789.dkr.ecr.us-east-1.amazonaws.com/ploomber-project-repository-grid
We’ll now get a sample project. First, let’s install the required packages.
Note: We recommend you install them in a virtual environment.
pip install ploomber soopervisor --upgrade --quiet
Download the example in the grid directory:
ploomber examples -n cookbook/grid -o grid
Output:
Loading examples...
Examples copy is more than 1 day old...
Cloning into '/Users/Edu/.ploomber/projects'...
remote: Enumerating objects: 606, done.[K
remote: Counting objects: 100% (606/606), done.[K
remote: Compressing objects: 100% (489/489), done.[K
remote: Total 606 (delta 116), reused 341 (delta 54), pack-reused 0[K
Receiving objects: 100% (606/606), 4.30 MiB | 16.45 MiB/s, done.
Resolving deltas: 100% (116/116), done.
[34m==================== Copying example cookbook/grid to grid/ ====================[0m
Next steps:
$ cd grid/
$ ploomber install[34m
Open grid/README.md for details.
[0m[0m
This downloaded a full project:
ls grid
Output:
README.ipynb _source.md pipeline.yaml [1m[36mscripts[39;49m[0m/
README.md environment.yml requirements.txt [1m[36mtasks[39;49m[0m/
The example we downloaded prepares some data and trains a dozen Machine Learning models in parallel, here’s a graphical representation:
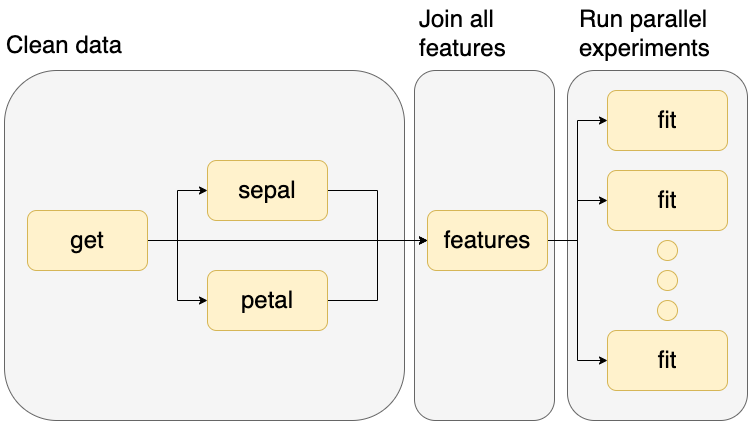
Let’s look at the pipeline.yaml file, which specifies the tasks in our workflow:
cat grid/pipeline.yaml
Output:
# run tasks in parallel
executor: parallel

tasks:
  - source: tasks.raw.get
    product: products/raw/get.csv

  - source: tasks.features.sepal
    product: products/features/sepal.csv

  - source: tasks.features.petal
    product: products/features/petal.csv

  - source: tasks.features.features
    product: products/features/features.csv

  - source: scripts/fit.py
    # generates tasks fit-1, fit-2, etc
    name: fit-[[model_type]]-[[n_estimators]]-[[criterion]][[learning_rate]]
    # disabling static_analysis because the notebook does not have
    # a fixed set of parameters (depends on random-forest vs ada-boost)
    static_analysis: disable
    product:
      nb: products/report-[[model_type]]-[[n_estimators]]-[[criterion]][[learning_rate]].html
      model: products/model-[[model_type]]-[[n_estimators]]-[[criterion]][[learning_rate]].pickle
    grid:
      # generates 6 tasks (1 * 3 * 2)
      - model_type: [random-forest]
        n_estimators: [1, 3, 5]
        criterion: [gini, entropy]

      # generates 6 tasks (1 * 3 * 2)
      - model_type: [ada-boost]
        n_estimators: [1, 3, 5]
        learning_rate: [1, 2]
The pipeline.yaml is one interface that Ploomber has to describe computational workflows (you can also declare them with Python).
The tasks section contains five entries, one per task. The first four are Python functions that process some input data (tasks.raw.get, tasks.features.sepal, tasks.features.petal, tasks.features.features), and the last one is a script that fits a model (scripts/fit.py).
Note the last entry is longer because it’s a grid task: it’ll use the same script and execute it multiple times with different parameters. In total, the script will be executed 12 times, but this could be a larger number.
To learn more about the pipeline.yaml file and Ploomber, check our documentation.
Let’s now configure AWS Batch as our cloud environment (Kubernetes, SLURM, and Airflow are supported as well):
cp grid/requirements.txt grid/requirements.lock.txt

cd grid
soopervisor add aws-env --backend aws-batch
cd ..
Output:
[34m================================= Loading DAG ==================================[0m
No pipeline.aws-env.yaml found, looking for pipeline.yaml instead
Found /Users/Edu/dev/ploomber.io/raw/ds-platform-part-iii/grid/pipeline.yaml. Loading...
[34m= Adding /Users/Edu/dev/ploomber.io/raw/ds-platform-part-iii/grid/aws-env/Dockerfile... =[0m
[32m===================================== Done =====================================[0m
Fill in the configuration in the 'aws-env' section in soopervisor.yaml then submit to AWS Batch with: soopervisor export aws-env
Environment added, to export it:
$ soopervisor export aws-env
To force execution of all tasks:
$ soopervisor export aws-env --mode force
[0m
There are a few extra things we need to configure, to facilitate the setup, we created a script that automates these tasks depending on your AWS infrastructure, let’s download it:
curl -O https://raw.githubusercontent.com/ploomber/posts/master/ds-platform-part-ii/generate.py
Output:
  % Total    % Received % Xferd  Average Speed   Time    Time     Time  Current
                                 Dload  Upload   Total   Spent    Left  Speed
100  3211  100  3211    0     0  22935      0 --:--:-- --:--:-- --:--:-- 22935
Now, set the values for the AWS Batch job queue and artifacts bucket you want to use. If in doubt, you might want to revisit the previous tutorials (part I and part II).
JOB_QUEUE=ploomber-batch-queue
BUCKET_NAME=ploomber-bucket-zxmmcm
Let’s generate the configuration file that specifies the job queue to use and the ECR repository to upload our code:
python generate.py config \
    --directory grid \
    --queue $JOB_QUEUE \
    --region $AWS_REGION \
    --repository $REPOSITORY
Output:
Config file stored at: grid/soopervisor.yaml
Now, let’s specify the S3 client so the outputs of the pipeline are uploaded to the bucket:
python generate.py client \
    --directory grid \
    --bucket-name $BUCKET_NAME
Output:
Clients file stored at: grid/clients.py
Modify the pipeline.yaml so it uses the client we created in the step above:
python generate.py client-cfg \
    --directory grid
Let’s upload our project to ECR:
pip install boto3 --quiet
aws ecr get-login-password \
    --region $AWS_REGION \
    | docker login \
    --username AWS \
    --password-stdin $REPOSITORY
Output:
Login Succeeded
Ensure boto3 is installed as part of our project. We need to upload to S3:
echo -e '\nboto3' >> grid/requirements.lock.txt
We’re now ready to schedule our workflow! Let’s use the soopervisor export command to build the Docker image, push it to ECR and schedule the jobs on AWS Batch:
cd grid
soopervisor export aws-env --mode force \
    --ignore-git --skip-tests > ../output.log 2>&1
cd ..
You can monitor execution in the AWS Batch console. Or use the following command, just ensure you change the job name. The following command retrieves the status of the fit-random-forest-1-gini task:
aws batch list-jobs --job-queue $JOB_QUEUE \
    --filters 'name=JOB_NAME,values=fit-random-forest-1-entropy' \
    --query 'jobSummaryList[*].status' \
    --region $AWS_REGION
Output:
[
    "SUCCEEDED"
]
After a few minutes, all tasks should be executed!
Let’s check the outputs in the S3 bucket:
aws s3api list-objects --bucket $BUCKET_NAME \
    --query 'Contents[].Key'
Output:
[
    "outputs/products/.model-ada-boost-1-1-6.pickle.metadata",
    "outputs/products/.model-ada-boost-1-2-7.pickle.metadata",
    "outputs/products/.model-ada-boost-3-1-8.pickle.metadata",
    "outputs/products/.model-ada-boost-3-2-9.pickle.metadata",
    "outputs/products/.model-ada-boost-5-1-10.pickle.metadata",
    "outputs/products/.model-ada-boost-5-2-11.pickle.metadata",
    "outputs/products/.model-random-forest-1-entropy-1.pickle.metadata",
    "outputs/products/.model-random-forest-1-gini-0.pickle.metadata",
    "outputs/products/.model-random-forest-3-entropy-3.pickle.metadata",
    "outputs/products/.model-random-forest-3-gini-2.pickle.metadata",
    "outputs/products/.model-random-forest-5-entropy-5.pickle.metadata",
    "outputs/products/.model-random-forest-5-gini-4.pickle.metadata",
    "outputs/products/.report-ada-boost-1-1-6.html.metadata",
    "outputs/products/.report-ada-boost-1-2-7.html.metadata",
    "outputs/products/.report-ada-boost-3-1-8.html.metadata",
    "outputs/products/.report-ada-boost-3-2-9.html.metadata",
    "outputs/products/.report-ada-boost-5-1-10.html.metadata",
    "outputs/products/.report-ada-boost-5-2-11.html.metadata",
    "outputs/products/.report-random-forest-1-entropy-1.html.metadata",
    "outputs/products/.report-random-forest-1-gini-0.html.metadata",
    "outputs/products/.report-random-forest-3-entropy-3.html.metadata",
    "outputs/products/.report-random-forest-3-gini-2.html.metadata",
    "outputs/products/.report-random-forest-5-entropy-5.html.metadata",
    "outputs/products/.report-random-forest-5-gini-4.html.metadata",
    "outputs/products/features/.features.csv.metadata",
    "outputs/products/features/.petal.csv.metadata",
    "outputs/products/features/.sepal.csv.metadata",
    "outputs/products/features/features.csv",
    "outputs/products/features/petal.csv",
    "outputs/products/features/sepal.csv",
    "outputs/products/model-ada-boost-1-1-6.pickle",
    "outputs/products/model-ada-boost-1-2-7.pickle",
    "outputs/products/model-ada-boost-3-1-8.pickle",
    "outputs/products/model-ada-boost-3-2-9.pickle",
    "outputs/products/model-ada-boost-5-1-10.pickle",
    "outputs/products/model-ada-boost-5-2-11.pickle",
    "outputs/products/model-random-forest-1-entropy-1.pickle",
    "outputs/products/model-random-forest-1-gini-0.pickle",
    "outputs/products/model-random-forest-3-entropy-3.pickle",
    "outputs/products/model-random-forest-3-gini-2.pickle",
    "outputs/products/model-random-forest-5-entropy-5.pickle",
    "outputs/products/model-random-forest-5-gini-4.pickle",
    "outputs/products/raw/.get.csv.metadata",
    "outputs/products/raw/get.csv",
    "outputs/products/report-ada-boost-1-1-6.html",
    "outputs/products/report-ada-boost-1-2-7.html",
    "outputs/products/report-ada-boost-3-1-8.html",
    "outputs/products/report-ada-boost-3-2-9.html",
    "outputs/products/report-ada-boost-5-1-10.html",
    "outputs/products/report-ada-boost-5-2-11.html",
    "outputs/products/report-random-forest-1-entropy-1.html",
    "outputs/products/report-random-forest-1-gini-0.html",
    "outputs/products/report-random-forest-3-entropy-3.html",
    "outputs/products/report-random-forest-3-gini-2.html",
    "outputs/products/report-random-forest-5-entropy-5.html",
    "outputs/products/report-random-forest-5-gini-4.html"
]
You can see there’s a combination of .pickle files (the trained models), .csv (processed data), and .html (reports generated from the training script).
Let’s download one of the reports:
aws s3 cp s3://$BUCKET_NAME/outputs/products/report-random-forest-1-entropy-1.html report.html
Output:
download: s3://ploomber-bucket-3gsajz/outputs/products/report-random-forest-1-entropy-1.html to ./report.html
Open the report.html and you’ll see the outputs of the training script!
Let’s take a look at the grid/soopervisor.yaml file which configures the cloud environment:
cat grid/soopervisor.yaml
Output:
aws-env:
  backend: aws-batch
  container_properties: {memory: 16384, vcpus: 8}
  exclude: [output]
  job_queue: ploomber-batch-queue
  region_name: us-east-1
  repository: 0123456789.dkr.ecr.us-east-1.amazonaws.com/ploomber-project-repository-grid
The soopervisor.yaml file specifies the backend to use (aws-batch), the resources to use by default ({memory: 16384, vcpus: 8}), the job queue, region and repository.
We can add a new section to specify per-task resources, to override the default value:
task_resources:
  get: # resources for the "get" task
    memory: 16384
    vcpus: 8
  fit-*: # match all tasks that begin with "fit-"
    memory: 32768
    vcpus: 16
    gpu: 1
In this final part, we showed how to create multi-step workflows, and how to parametrize a script to create a grid of experiments that can run in parallel. Now you have a scalable infrastructure to run Data Science and Machine Learning experiments!
If you need help customizing the infrastructure or want to share your feedback, please join our community!
To keep up-to-date with our content; follow us on Twitter, LinkedIn, or subscribe to our newsletter!
Here’s the command you need to run to delete the ECR repository we created on this post. To delete all the infrastructure, revisit the previous tutorials.
aws ecr delete-repository \
    --repository-name ploomber-project-repository-grid \
    --region $AWS_REGION \
    --force
Output:
{
    "repository": {
        "repositoryArn": "arn:aws:ecr:us-east-1:0123456789:repository/ploomber-project-repository-grid",
        "registryId": "0123456789",
        "repositoryName": "ploomber-project-repository-grid",
        "repositoryUri": "0123456789.dkr.ecr.us-east-1.amazonaws.com/ploomber-project-repository-grid",
        "createdAt": "2022-10-28T10:06:04-04:00",
        "imageTagMutability": "MUTABLE"
    }
}
Seamless deployment for data scientists and developers. Ploomber handles infrastructure so you focus on building. Secure and scalable—from personal projects to enterprise apps. Support for Streamlit, Dash, Docker, and AI-powered applications. Because life's too short for deployment headaches.

