


In this blog we will show you how to automate deployment of a pipeline and a data app with Ploomber Cloud and GitHub Actions.
The data pipeline extracts weather data, our goal is to automatically run a data refresh every day and populate a cloud-based database with the latest data. Then, we want to generate visualizations from the data through an app.
We will use Voila and Docker to serve our application and Ploomber Cloud to easily deploy.
GitHub Actions is an integrated continuous integration and continuous delivery (CI/CD) service that helps you automate, customize, and execute software development workflows directly within your GitHub repository. It offers a wide range of automation capabilities, allowing you to trigger actions in response to various events.
Before diving into the details, let’s familiarize ourselves with some key concepts:
Workflow: A workflow is a series of automated steps that define how your code is built, tested, and deployed. You can create multiple workflows for different purposes within a repository.
Action: An action is a reusable, standalone script or task that can be included in a workflow. GitHub provides a marketplace of pre-built actions, and you can also create custom actions.
Event: An event is a specific activity that occurs in your repository, such as pushing code, creating pull requests, or releasing a new version. Workflows can be triggered by these events.
We have created a more in-depth guide to GitHub Actions, which you can find here.
With Ploomber Cloud, you can enjoy a platform where AI/ML applications can be deployed with minimal hassle. Here’s a comprehensive guide to getting started with Ploomber Cloud and leveraging its deployment capabilities, including its CLI and integration with GitHub for continuous deployment.
First, head to the Ploomber Cloud sign-up page and create a free account using your email and a password.
After signing up, check your inbox (and spam folder, just in case) for a confirmation email. Click the provided link to activate your account.
Now, return to Ploomber Cloud and sign in with your credentials.
Congratulations, you’re all set! Next, explore how to deploy your first application.
To interact with Ploomber Cloud, you’ll need an API key. After signing up, navigate to your account section and copy the API key.
Install the Ploomber Cloud package using pip:
pip install ploomber-cloud
Next, set your API key as an environment variable:
ploomber-cloud key YOUR-KEY
Initialize a New App
ploomber-cloud init
This will create a ploomber-cloud.json file in the directory where you ran the command. This file contains the configuration for your project. You can edit this file to customize your project’s configuration. This is what it looks like:
{
    "id": "APP_ID",
    "type": "APP_TYPE"
}
Where your APP_ID is a unique identifier created when you run the init command and APP_TYPE is the type of application you’re deploying (docker, Streamlit, etc.)
After initialization, deploy your app using:
ploomber-cloud deploy
The deploy command provides a URL for tracking your deployment’s progress.
Necessary imports
pip install voila==0.5.1 pandas==2.0.3 plotly python-dotenv requests duckdb==v0.9.2
We have a starter data download and upload script that you can use to get started.
This script defines functions to extract weather data, transform it into a DataFrame, and populates a Motherduck instance. To review how to initialize a MotherDuck instance, visit the MotherDuck documentation. You will need to create an account and generate a token.
The executable script takes as input a list of coordinates and extracts weather data for each coordinate. The script then concatenates all the data frames and saves the result into a CSV file. The CSV file is then uploaded to a Motherduck instance.
You can create a Python script called dataextraction.py with the following code. The code has four functions: extract_weather_by_lat_lon, transform_json_to_dataframe, extraction_df_lat_lon, and save_to_motherduck.
The extract_weather_by_lat_lon function extracts weather data from the RapidAPI.
The transform_json_to_dataframe function transforms the JSON response to a DataFrame.
The extraction_df_lat_lon function extracts weather data from the RapidAPI and transforms it to a DataFrame.
The save_to_motherduck function saves the DataFrame to a Motherduck instance.
The main function of the script is the __main__ function. It loads the API key from an environment variable, extracts weather data for a list of coordinates, concatenates the data frames, and saves the result to a CSV file. The CSV file is then uploaded to a Motherduck instance.
As a sample, coordinates were obtained for the following locations:
| Continent | Cities |
|---|---|
| North America | New York City, Los Angeles , Toronto |
| South America | São Paulo ,Buenos Aires, Bogotá |
| Europe | London, Paris, Berlin |
| Asia | Tokyo , Beijing,Mumbai |
| Africa | Cairo ,Lagos, Johannesburg |
| Australia | Sydney , Melbourne , Brisbane |
To download weather data for different locations, you can replace the latitude and longitude coordinates in the script.
Let’s visualize the data to see what it looks like. We will use the Plotly package. For the purpose of the blog, we read the CSV file, to see what loading the data directly from MotherDuck, please review this notebook.
We can then execute the following notebook as a stand alone voila application.
import plotly.express as px
import duckdb
import os
from dotenv import load_dotenv
load_dotenv()
motherduck = os.getenv("motherduck")
# initiate the MotherDuck connection through a service token through
con = duckdb.connect(f"md:?motherduck_token={motherduck}")
df = con.sql("SELECT * FROM weatherdata").df()
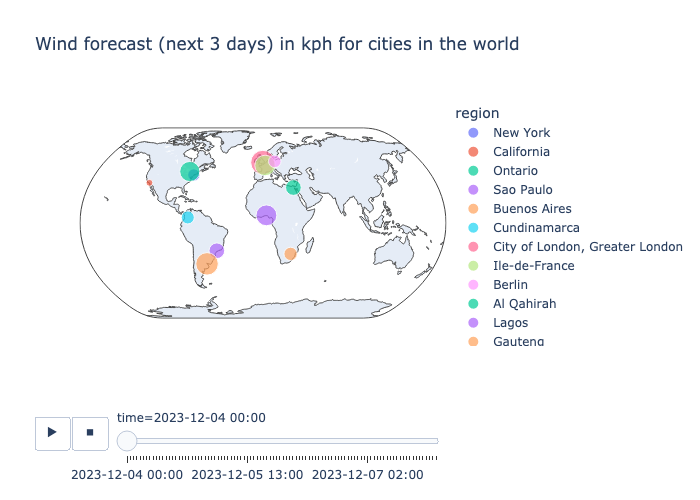
fig = px.scatter_geo(
df,
lat="lat",
lon="lon",
color="region",
hover_name="country",
size="wind_kph",
animation_frame="time",
projection="natural earth",
title="Wind forecast (next 5 days) in kph for cities in the world",
)
fig.show()
Sample plot (animation not activated):
Create a GitHub repository and add the Python script and Jupyter notebook to it. You can also add a README file to describe your project.
Next, create a Ploomber Cloud account and initialize the deployment. You can do this by running the following command in your terminal:
ploomber cloud init
This will generate a ploomber-cloud.json file. This file contains the configuration for your deployment. You can edit this file to add more information about your deployment. We will create a Dockerfile for our application.
{
    "id": "generated-id",
    "type": "docker"
}
Let’s take a look at the Dockerfile. For our deployment we will assume that we are using a Python 3.11 image. We will copy the Jupyter notebook and the .env file containing our RapidAPI and MotherDuck tokens to the image. We will install the dependencies and configure the entrypoint.
FROM python:3.11

# Copy all files
COPY app.ipynb app.ipynb
COPY .env .env

# install dependencies
RUN pip install voila==0.5.1 pandas==2.0.3 plotly python-dotenv requests duckdb==v0.9.2

# this configuration is needed for your app to work, do not change it
ENTRYPOINT ["voila", "app.ipynb","--port 5000:80"]
To deploy this from the terminal, we simply run
ploomber cloud deploy
This will build the image and push it to the Ploomber Cloud registry. You can see the status of your deployment in the Ploomber Cloud dashboard.
The following action is triggered every day at midnight. It runs the Python script to extract the data and deploys the application to Ploomber Cloud.
Important It assumes we have stored our RapidAPI and MotherDuck tokens as GitHub secrets.
name: Ploomber cloud deploy,en

on:
  schedule:
    - cron: '0 0 * * *'

jobs:

  build:

    runs-on: ubuntu-latest

    steps:
    - uses: actions/checkout@v3
    - name: Set up Python 3.10
      uses: actions/setup-python@v3
      with:
        python-version: "3.10"
    - name: Set up credentials
      run: |
          cd mini-projects/end-to-end/
          touch .env
          echo RapidAPI=${{ secrets.RapidAPI }} >> .env
          echo motherduck=${{ secrets.motherduck }} >> .env
    - name: Install dependencies
      run: |
          cd mini-projects/end-to-end/
          pip install -r requirements.txt
    - name: Execute data download
      run: |
          cd mini-projects/end-to-end/
          python dataextraction.py
    - name: Deploy to Ploomber cloud
      run: |
          cd mini-projects/end-to-end/
          ploomber-cloud deploy
In this blog we explored how to deploy Python applications with Ploomber Cloud and GitHub actions. We used a sample project to demonstrate the process. We created a Python script to extract weather data from an API and load it into a Motherduck instance. We then created a Jupyter notebook to visualize the data. We created a GitHub repository and initialized the deployment with Ploomber Cloud. We created a GitHub workflow to run the Python script and deploy the application to Ploomber Cloud.
Seamless deployment for data scientists and developers. Ploomber handles infrastructure so you focus on building. Secure and scalable—from personal projects to enterprise apps. Support for Streamlit, Dash, Docker, and AI-powered applications. Because life's too short for deployment headaches.

