


We presented a shorter version of this blog series at PyData Global 2021.
Click here for Part II, here for Part III.
This blog post series describes a strategy I’ve developed over the last couple of years to test Machine Learning projects effectively. Given how uncertain ML projects are, this is an incremental strategy that you can adopt as your project matures; it includes test examples to provide a clear idea of how these tests look in practice, and a complete project implementation is available on GitHub. By the end of the post, you’ll be able to develop more robust ML pipelines.
Testing Machine Learning projects is challenging. Training a model is a long-running task that may take hours to run and has a non-deterministic output, which is the opposite we need to test software: quick and deterministic procedures. One year ago, I published a post on testing data-intensive projects to make Continuous Integration feasible. I later turned that blog post into a talk and presented it at PyData 2020. But such previous work only covered generic aspects of testing data pipelines and left out testing ML models.
It’s important to clarify that testing and monitoring are two different things. Testing is an offline process that allows us to evaluate whether our code does what it’s supposed to do (i.e., produce a high-quality model). In contrast, monitoring involves inspecting a deployed model to ensure it works correctly. Thus, testing happens before deployment; monitoring occurs after deployment.
I use the terms pipeline and task throughout the post. A task is a unit of work (usually a function or a script); for example, one task can be a script that downloads the raw data, and another could clean such data. On the other hand, a pipeline is just a series of tasks executed in a pre-defined order. The motivation for building pipelines made of small tasks is to make our code more maintainable and easier to test; that lines up with the goal of our open-source framework to help data scientists build more maintainable projects using Jupyter. In the following sections, you’ll see some sample Python code; we use pytest, pandas, and Ploomber.
If you’d like to know when the second part is out, subscribe to our newsletter, follow us on Twitter or LinkedIn.
Before we describe the testing strategy, let’s analyze how a typical ML pipeline looks. By analyzing each part separately, we can clearly state its role in the project and design a testing strategy accordingly. A standard ML pipeline has the following components:
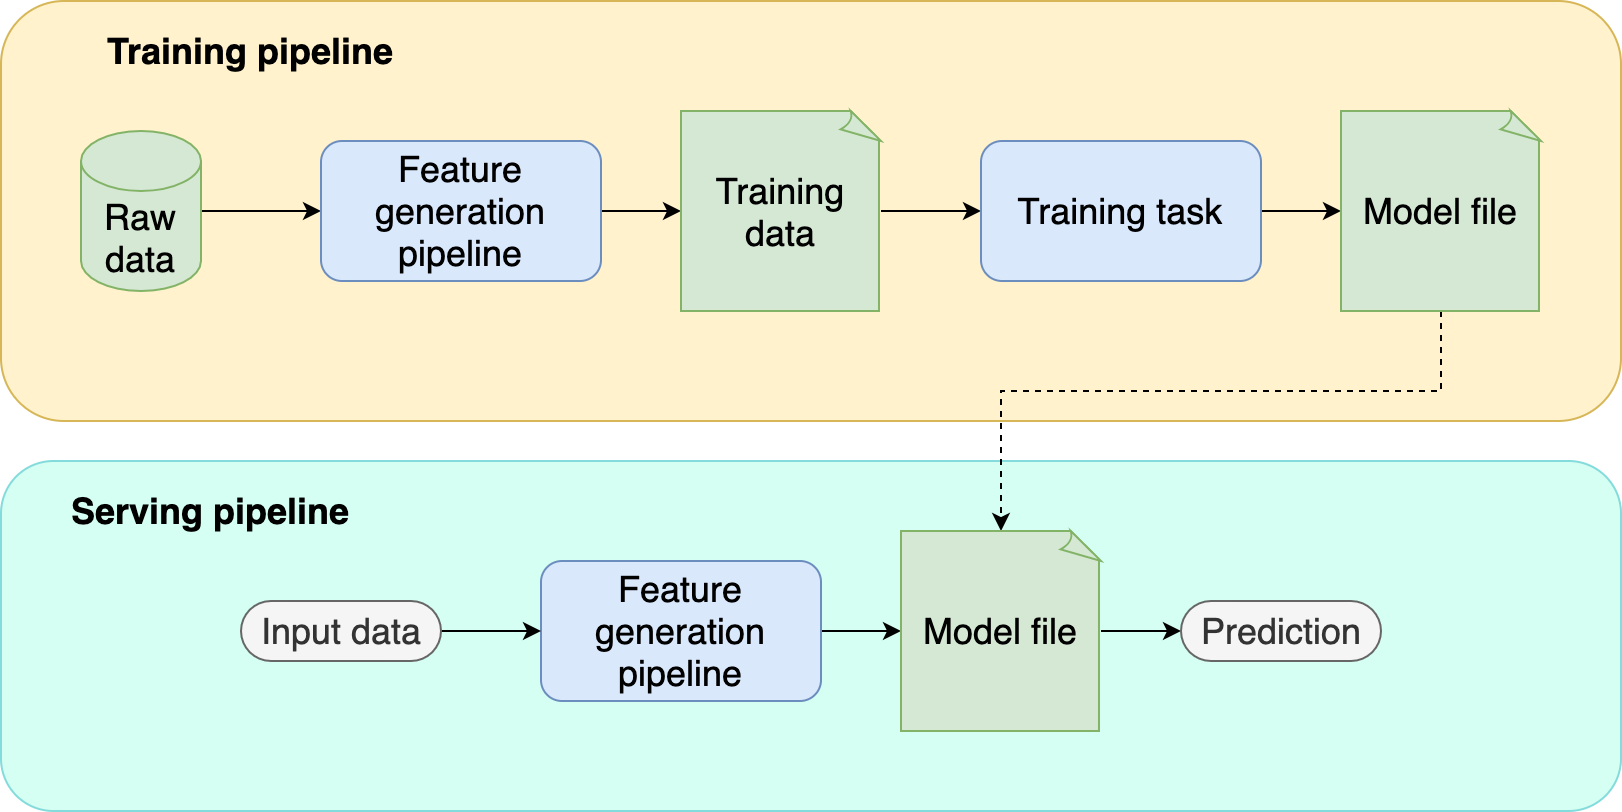
To motivate our testing strategy, let’s enumerate what could go wrong with each part:
Note that this isn’t an exhaustive list, but it covers the most common problems. Depending on your use case, you may have other potential issues, and it’s vital to list them to customize your testing strategy accordingly.
When developing ML models, the faster we iterate, the higher the chance of success. Unlike traditional software engineering projects where it’s clear what we should build (e.g., a sign-up form), ML projects have a lot of uncertainty: Which datasets to use? What features to try? What models to use? Since we don’t know the answer to those questions in advance, we must try a few experiments and evaluate whether they yield better results. Because of this uncertainty, we have to balance iteration speed with testing quality. If we iterate too fast, we risk writing sloppy code; if we spend too much time thoroughly testing every line of code, we won’t improve our models fast enough.
This framework steadily increases the quality of your tests. The strategy consists of five levels; when reaching the last level, you have robust enough testing that allows you to push new model versions to production confidently.
git push.pytestIf you’ve used pytest before, you may skip this section.
Tests are short programs that check whether our code is working. For example:
# test_math.py
from my_math_project import add, subtract

def test_add():
    assert add(1, 1) == 2

def test_subtract():
    assert subtract(43, 1) == 42
A test is a function that runs some code, and asserts its output. For example, the previous file has two tests: test_add and test_substract, organized in a file called test_math.py; it’s usual to have one file per module (e.g., test_math.py tests all functions in a math.py module). Testing files usually go under a tests/ directory:
tests/
    test_math.py
    test_stuff.py
    ...
    test_other.py
Testing frameworks such as pytest allow you to collect all your tests, execute them and report which ones fail and which ones succeed:
# collect rests, run them, and report results
pytest
A typical project structure looks like this:
src/
exploratory/
tests/
src/ contains your project’s pipeline’s tasks and other utility functions. exploratory/ includes exploratory notebooks and your tests go into the tests/ directory. The code in src/ must be importable from the other two directories. The easiest way to achieve this is to package your project. Otherwise, you have to fiddle with sys.path or PYTHONPATH.
Sample code is available here. The repository has five branches, each implementing the testing levels I’ll describe in upcoming sections. Since this is a progressive strategy, you can see the evolution of the project by starting from the first branch and moving up to the following branches.
The project implements the pipeline using Ploomber, our open-source framework. Hence, you can see the pipeline specification in the pipeline.yaml file. To see which commands we’re using to test the pipeline, open .github/workflows/ci.yml, this is a GitHub actions configuration file that tells GitHub to run certain commands on each git push.
While not strictly necessary, you may want to check out our Ploomber introductory tutorial to understand the basic concepts.
Note that the code snippets displayed in this blog post are generic (they don’t use any specific pipeline framework) because we want to explain the concept in general terms; however, the sample code in the repository uses Ploomber.
Smoke testing is the most basic level of testing and should be implemented as soon as you start a project. Smoke testing does not check the output of your code but only ensures that it runs. While it may seem too simplistic, it’s much better than not having tests at all.
Listing external dependencies is step zero when starting any software project, so ensure you document all the dependencies needed to run your project when creating your virtual environment. For example, if using pip, your requirements.txt file may look like this:
ploomber
scikit-learn
pandas
After creating your virtual environment, create another file (requirements.lock.txt) to register installed versions of all dependencies. You can do so with the pip freeze > requirements.lock.txt command (execute it after running pip install -r requirements.txt), which generates something like this:
ploomber==0.13
scikit-learn==0.24.2
pandas==1.2.4
# more packages required by your dependencies...
Recording specific dependency versions ensures that changes from any of those packages do not break your project.
Another important consideration is to keep your list of dependencies as short as possible. There’s usually a set of dependencies you need at development time but not in production. For example, you may use matplotlib for model evaluation plots, but you don’t need it to make predictions. Splitting your development and deployment dependencies is highly recommended. Projects with a lot of dependencies increase the risk of running into version conflicts.
One of the first milestones in your project must be to get an end-to-end feature generation pipeline. Write some code to get the raw data, perform some basic cleaning, and generate some features. Once you have an end-to-end process working, you must ensure that it is reproducible: delete the raw data and check that you can re-run the process and get the same training data.
Once you have this, it’s time to implement our first test; run the pipeline with a sample of the raw data (say, 1%). The objective is to make this test run fast (no more than a few minutes). Your test would look like this:
from my_project import generate_features_and_label

def test_generate_training_set():
    my_project.generate_features_and_label(sample=True)
Note that this is a basic test; we’re not checking the output of the pipeline! However, this simple test allows us to check whether the code runs. It’s essential to run this test whenever we execute git push. If you’re using GitHub, you can do so with GitHub Actions, other git platforms have similar features.
After generating features, you train a model. The training task takes a training set as an input and outputs a model file. Testing the model training procedure is challenging because we cannot easily define an expected output (model file) given some input (training set) – mainly because our training set changes rapidly (i.e., add, remove features). So, at this stage, our first test only checks whether the task runs. Since we disregard the output (for now), we can train a model with a sample of the data; remember that this smoke test must execute on every push. So let’s extend our previous example to cover feature generation and model training:
from my_project import generate_features_and_label, train_model

def test_train_model():
    # test we can generate features
    X, y = my_project.generate_features_and_label(sample=True)
    # test we can train a model
    model = train_model(X, y)
In the sample repository, we are using Ploomber, so we test the feature pipeline and training task by calling ploomber build, which executes all tasks in our pipeline.
It’s essential to modularize the pipeline in small tasks to allow us to test outputs separately. After implementing this second testing level, you achieve two things:
Let’s discuss the first objective.
Testing data processing code is complicated because its goal is subjective. For example, imagine I ask you to test a function that takes a data frame and cleans it. How would you test it? The idea of data cleaning is to improve data quality. However, such a concept depends on the specifics of the data and your project. Hence, it’s up to you to define the clean data concept and translate that into integration tests, although in this case, we can use the term data quality tests to be more precise.
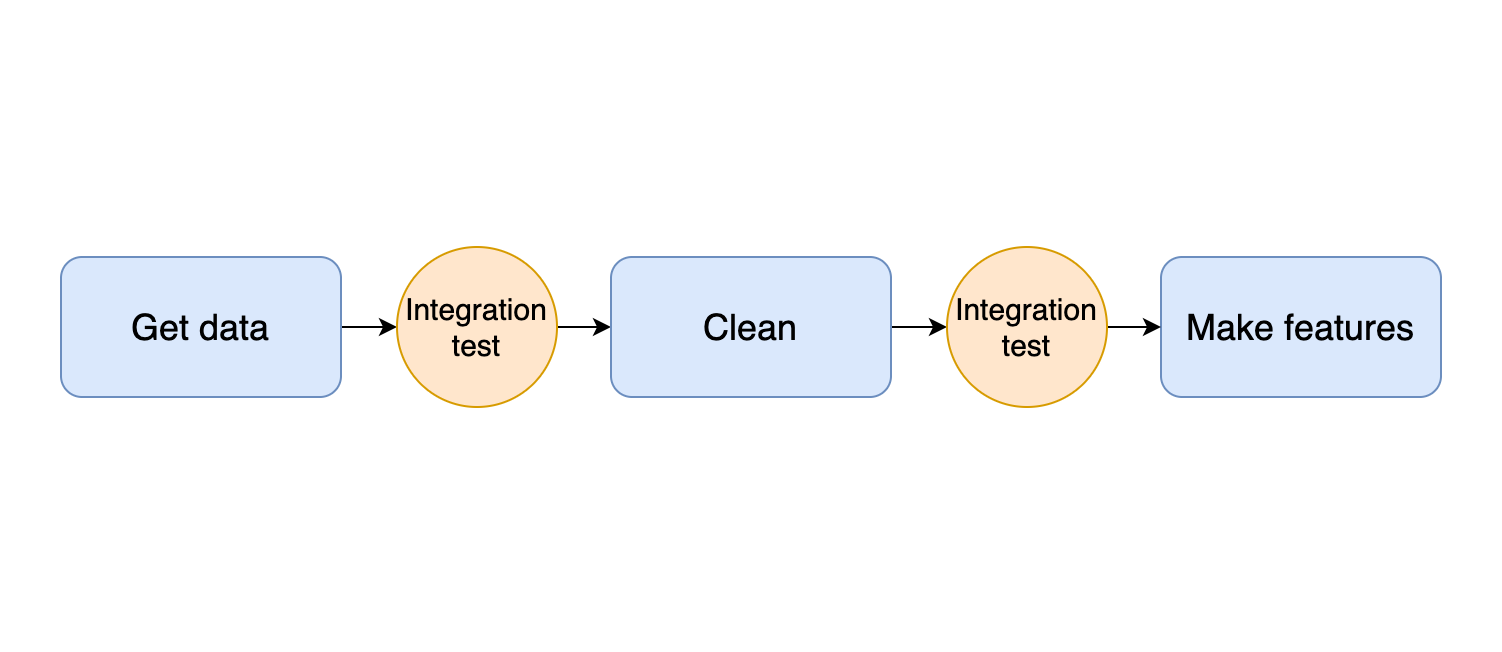
The idea of integration testing applies to all stages in your pipeline: from downloading data to generating features: it’s up to you to define the expectations at each stage. We can see a graphical representation of integration testing in the following diagram:
For example, to add integration tests to a data cleaning function (let’s call it clean), we run a few checks at the end of the function’s body to verify its output quality. Common checks include no empty values, numerical columns within expected ranges or categorical values within a pre-defined set of values:
def clean(df)
    # clean data frame with raw data
    # ...
    # ...

    # integration test: check age column has a minimum value of 0
    assert df.age.min() > 0
This form of testing is different than the one we introduced in the first section. Unit tests exist in the tests/ folder and can run independently, but integration tests run when you execute your training pipeline. Failing tests mean your data assumptions do not hold, and data assumptions must be re-defined (which implies updating your tests accordingly), or your cleaning procedure should change to ensure your tests pass.
You can write integration tests without any extra framework by adding assert statements at the end of each task. However, some libraries can help. For example, Ploomber supports running a function when a task finishes.
Here’s the implementation of an integration test in our sample repository.
Within each task in your pipeline (e.g., inside clean), you’ll likely have smaller routines; such parts of your code should be written as separate functions and unit tested (i.e., add tests in the tests/ directory).
A good candidate for writing unit tests is when applying transformations to individual values in a column. For example, say that you’re using the heart disease dataset and create a function to map the chest_pain_type categorical column from integers to their corresponding human-readable values. Your clean function may look like this:
import transform

def clean(df):
    # some data cleaning code...
    # ...

    df['chest_pain_type'] = transform.chest_pain_type(df.chest_pain_type)

    # ...
    # more data cleaning code...
Unlike the general clean procedure, transform.chest_pain_type has an explicit, objectively defined behavior: it should map integers to the corresponding human-readable values. We can translate this into a unit test by specifying the inputs and the expected outputs.
def test_transform_chest_pain_type():
    # sample input
    series = pd.Series([0, 1, 2, 3])

    # expected output
    expected = pd.Series([
        'typical angina',
        'atypical angina',
        'non-anginal pain',
        'asymptomatic',
    ])

    # test
    assert transform.chest_pain_type(series).equals(expected)
Unit testing must be a continuous stream of work on all upcoming testing levels. Therefore, whenever you encounter a piece of logic with a precise objective, abstract it into a function and test it separately.
Here’s an implementation of a unit test in the sample repository.
So far, we’ve implemented a basic strategy that ensures that our feature generation pipeline produces data with a minimum level of quality (integration tests or data quality tests) and verifies the correctness of our data transformations (unit tests). In the next part of this series, we’ll add more robust tests: test for distribution changes, ensure that our training and serving logic is consistent, and check that our pipeline produces high-quality models.
If you’d like to know when the second part is out, subscribe to our newsletter, follow us on Twitter or LinkedIn.
Seamless deployment for data scientists and developers. Ploomber handles infrastructure so you focus on building. Secure and scalable—from personal projects to enterprise apps. Support for Streamlit, Dash, Docker, and AI-powered applications. Because life's too short for deployment headaches.

