


As Ploomber becomes the go-to tool for building pipelines from Jupyter, we’ve seen an increasing interest from our community to contribute to the project. We’re extremely honored to have such a vibrant community willing to go the extra mile, especially because many of our contributors are first-time open-source contributors. To help new open-source contributors, we’ve prepared this in-depth guide that covers all you have to know to make your first contribution. Let’s get started!
Note that this guide focuses on contributing to Python projects hosted on GitHub, but the guidelines are broadly applicable.
Head to the issues section once you’ve chosen a project to contribute. For example, click here to see Ploomber’s issues. A GitHub issue is something that the contributors need help with; the complexity and involved work varies, so if you’re contributing for the first time to a particular project, it’s a good idea to filter by good first issue; such issues are suitable for your first contribution, click here to see Ploomber’s good first issues.
Consider spending some time navigating the issues; the tags are a quick way of identifying what they involve. Then, if you’re interested in any of them, click on any of them and check the description. Maintainers often provide a brief description, but you can ask for more details if you’re interested.
Once you have identified an issue you want to work on, ask a maintainer to assign it to you. Once the maintainers reply and assign it to you, you can start working on it. It’s essential to ask questions before you begin your work to get on the same page with the maintainers. Remember that they will be reviewing your code.
Note that different projects have different rules, so check the CONTRIBUTING document in the repository to understand the contribution guidelines. The CONTRIBUTING file is in the root folder, but the extension might vary (common extensions are .md, and .rst). For example, this is Ploomber’s CONTRIBUTING.md file.
Often, projects need help with documentation; this is easier than contributing with code since you can edit the files from GitHub’s online editor. However, documentation is crucial to any project, so don’t underestimate its importance! For example, here are the documentation issues in Ploomber’s repository.

Now it’s time to fork the repository. Forking means creating a copy of the repository to your account. Repositories are identified by a username (or organization name) and the repository name. For example, Ploomber’s URL is github.com/ploomber/ploomber, which means it is under the Ploomber organization, and the repository name is also Ploomber. If the repository belongs to an individual account, it will have the same format; for example, my project sklearn-evaluation is under github.com/edublancas/sklearn-evaluation, where edublancas is my account, and sklearn-evaluation the repository name.
Once you fork a repository, GitHub will create a copy in your account. For example, if you fork Ploomber, it will create a repository under github.com/{your-username}/ploomber. After forking the repository, clone it locally:
git clone github.com/{your-username}/{repository-name}
Note that we’re cloning the fork, not the original repository! This means that any changes to the code will not affect the main repository, so feel free to experiment!
It is a good practice to create a new branch; you can do so with:
cd {repository-name}
git checkout -b {branch-name}
Now it’s time to start coding! The CONTRIBUTING document often contains the instructions to set up the development environment. For example, in Ploomber, once you cloned the repository, you can set up the development environment with:
pip install invoke
invoke setup
The CONTRIBUTING document often specifies how to test your environment to ensure successful installation.
Generally speaking, there are two types of code contributions: bug fixes and new features. Bug fixes involve improving something that’s already implemented but isn’t working as expected, while new features entail adding unique characteristics to the project. Our recommended process is the same in both cases: write your tests first.
A test is a short program that checks that the library behaves as expected given some input. Libraries have tests distributed across many files. And usually, they’re located in a tests/ directory at the root of the project. For example, this is Ploomber’s tests directory. The logic to organize tests changes; for instance, in Ploomber, we have one file per module in the project: here’s the dag module and here’s the test folder for testing the dag module.
Writing a test first will allow you to have a quick way of checking your implementation, plus showing your test to the maintainer allows you to get on the same page in terms of code functionality. So, as a first step, find where to add the test. Usually, you’ll be modifying an existing test file, but when in doubt, ask the maintainer.
To make things concrete, let’s say you’re working on fixing a bug in a function called sum, and the issue has the following description:
There's an error in the sum function, it should output 4 when called as sum(2, 2), but it outputs 5
Often, you’ll encounter descriptions with short descriptions, but you can be proactive and start gathering information about what’s required. For example, you can use GitHub’s search bar to locate the sum function definition. By default, the search bar will look up the query in the existing repository. So, in this case, you may search for sum, or, even better, for def sum to find the definition of the function.
Once you’ve identified where you would be making code changes, locate the appropriate test file. So look in the tests/ folder and see if you can find where the maintainers are testing the sum function. If you cannot find it, it’s ok to ask, but the maintainer will greatly appreciate it if you take the time to understand the codebase layout and identify the relevant files. Once you’ve identified the test file, edit it locally and add a new test; essentially, you need to translate the issue description into a program; following our example, here’s a simple test:
# import the function to test
from project.math import sum

# add a test
def test_sum_positive_numbers()
    x = 2
    y = 2
    assert sum(x, y) == 4
First, we added an import statement to get the function that we’re testing; then, we created a test by defining a function prefixed by test_, note that we have a long name, that’s ok; it’s essential to have descriptive names.
A great way to write good tests is by using the Given-When-Then template (or GWT). GWT breaks our test logic into three parts: given (existing conditions), when (code to test), then (expected results). The following snippet shows the same test explicitly organized using the GWT template:
def test_sum_positive_numbers()
    # given...
    x = 2
    y = 2

    # when...
    result = sum(x, y)

    # then...
    assert result == 4
However, to reduce verbosity, we often collapse the different sections, especially in a simple case, so you’d normally write something like this:
def test_sum_positive_numbers()
    assert sum(2, 2) == 4
I recommend you explicitly organize the different GWT parts in more extensive tests. Note that our test essentially translates the issue description into code since it formally describes how things should work.
The assert keyword helps us establish the rule that our test will evaluate. If the statement is true, nothing will happen; if it’s false, it will trigger an error, causing our test to fail. In some cases, libraries provide testing tools to simplify writing these assert statements. For example, pandas has a pandas.testing module with valuable functions to compare data frames. A great way to learn more about how you can proceed with your test is to look at existing tests since tests in the same file tend to be similar to each other.
Since we haven’t made any changes, it’s natural that the test will fail. Most Python projects use pytest for running tests (this should be specified in the CONTRIBUTING document). To run a single test:
pytest path/to/test_math.py::test_sum_positive_numbers
You’ll see that the test is failing, that’s expected since we haven’t fixed the bug!
In a real-world scenario, coming up with the sample test will require more work, so don’t be afraid to ask the maintainer for guidelines. Furthermore, existing tests can help give you an idea of how to test.
Once you have your (currently failing) test, it’s time to work on a fix (or a new feature if that’s the case). So go ahead and take a look at the module/function/class that requires changes; let’s say you find the following implementation:
def sum(x, y):
    return x + y + 1
After examining the code, you notice that the + 1 seems incorrect, so you delete it:
def sum(x, y):
    return x + y
Then, rerun the test:
pytest path/to/test_math.py::test_sum_positive_numbers
This time the test will pass!
Of course, things will require more work to get your code to pass. It’s easier to understand by interacting with it, as a recommendation, you may start an interactive session inside your test by adding the following:
from project.math import sum

def test_sum_positive_numbers()
    # start an interactive session
    # to use this, run: pip install ipython
    from IPython import embed; embed()
    assert sum(2, 2) == 4
Alternatively, you may use the pdb module:
from project.math import sum

def test_sum_positive_numbers():
    from pdb import set_trace; set_trace()
    assert sum(2, 2) == 4
The difference between using IPython and pdb is that the IPython behaves like a regular Python session while pdb has specific functionality for debugging code. To learn more, read pdb documentation.
In both IPython’s and pdb’s case, you need to pass the the -s flag to pytest:
pytest path/to/test_math.py::test_sum_positive_numbers -s
You’ll see that an interactive session starts. Now you can run things interactively to run some quick commands to help you understand the code. For example, you may run the function with different arguments:
sum(1, 1)

sum(1, 2)
Once you’re done experimenting, type quit and press enter to exit the session and remember to delete the from IPython import embed; embed() line (or from pdb import set_trace; set_trace() if using pdb).
Alternatively, you may want to let the test run and start a debugging session once it fails, in that case, there’s no need to add anything to the test source code. Keep it like this:
from project.math import sum

def test_sum_positive_numbers()
    assert sum(2, 2) == 4
And then execute the test with the --pdb flag:
pytest path/to/test_math.py::test_sum_positive_numbers --pdb
This time, the test will run, and if an exception occurs during the execution, it will start an interactive debugging session. Note that this is similar to a regular Python session, but it has a few extra things. Here’s a list of commands you can execute. The Python debugger is a handy tool for exploring the code interactively and understanding the conditions that led to the failure: variable values, which modules are involved, etc. To exit the debugging session, type quit and press enter.
As the name suggests, Pull Requests (or PR) are a request to pull your code into the original repository. When submitting one, maintainers can look at your code and decide to accept your proposed changes. However, Pull Requests are not a one-off process; if maintainers have observations, they will provide feedback and suggestions, then you can make changes to the code and ask for another review.
GitHub introduced Draft Pull Requests as a way for contributors to get early feedback and ensure you’re aligned with the maintainers. Getting on the same page via comments on the GitHub issue is difficult, so the maintainers will greatly appreciate that you draft a PR so they can see your progress and provide feedback. Getting your contributions merged into the codebase is a collective effort, so expect to have these back and forth feedback sessions a couple of times (or more, depending on the complexity of what you’re contributing).
There is no need to open another pull request if you make changes; push to your fork, and the Pull Request will automatically update. In Ploomber’s case, it’s ok to ask for feedback multiple times, but make an effort to have specific questions so the maintainer can quickly help you. When in doubt, check out the CONTRIBUTING document for the project you’re contributing to, as it might contain more specific instructions.
Once you pushed to your fork, the steps for opening a draft Pull Request are as follows:
{your-username}/repository-name)The process is shown below:
Congrats! You submitted a Pull Request! Now give some time for the maintainers to review your changes and share their feedback.
Depending on how complex the contribution is, you’ll most likely need to add more than one test. As you become familiar with the code, consider what other cases are relevant to test. Following our sum example, you might want to try negative numbers:
from project.math import sum

def test_sum_negative()
    assert sum(-2, -2) == -4
When in doubt, ask the maintainers if they can think of other relevant test cases; since they’re more familiar with the code, they’ll be in an excellent position to suggest them.
Often, test cases are pretty similar, except for their inputs and outputs. To simplify your code (and assuming the library you’re contributing to uses pytest), you can parametrize a test like this:
@pytest.mark.parametrize("x, y, expected", [
    (2, 2, 4),
    (-2, -2, -4),
])
def test_sum(x, y, expected):
    assert sum(x, y) == expected
Note that we renamed the test case since it now embeds many test cases, we may optionally add the ids argument to identify each test case:
@pytest.mark.parametrize("x, y, expected", [
    (2, 2, 4),
    (-2, -2, -4),
], ids=["positive", "negative"])
def test_sum(x, y, expected):
    assert sum(x, y) == expected
To run both test cases:
pytest path/to/test_math.py
To run a specific test case, pass the ID, for example:
# note the quotation marks
pytest "path/to/test_math.py::test_sum[positive]"
To learn more about pytest parametrization, check out the docs.
In our previous example, we were testing the output of a function, but this is only one type of test. In some cases, you may want to test that the code throws a meaningful error to the user. If the project you are contributing to uses pytest, you can test that particular exception is raised:
import pytest

def test_some_function_raises_error_when_passed_zero():
    with pytest.raises(ValueError):
        some_function(0)
Even better, you can test that a specific error message is shown like this:
import pytest

def test_some_function_raises_error_when_passed_zero():
    with pytest.raises(ValueError) as excinfo:
        some_function(0)

    assert "0 not allowed" in str(excinfo.value)
Note that we don’t need to import ValueError since it’s a built-in exception; in some cases, the project may define its exceptions (typically in an exceptions.py file), so you may need to import it:
import pytest

from project.exceptions import ZeroNotAllowed


def test_some_function_raises_error_when_passed_zero():
    with pytest.raises(ZeroNotAllowed) as excinfo:
        some_function(0)

    assert "0 not allowed" in str(excinfo.value)
After a few reviewing cycles, you’ll be ready for a final code review. Ideally, this should be fast since you already requested feedback during the drafting process. Before marking the Pull Request as ready for review, ensure the following:
1. Tests are passing locally
Ensure the tests you added are passing locally:
pytest path/to/test_math.py::test_sum
2. Check linting and formatting
Projects often use code linters that automatically check the code for specific rules; ensure that your code complies with the rules. (the CONTRIBUTING document should mention which linter the project uses so you can check it locally). Although to simplify things, some auto-formatters automatically make your code compliant with the linter (check the CONTRIBUTING document for more details).
If tests and the linting pass, you can git push and mark your PR as ready for review!
Your git push will trigger the repository’s Continuous Integration system (or CI). CI is a fancy way of saying “running all the tests on each PR.” Running all the tests ensures that your code doesn’t have any unintended side effects. Usually, test suites are pretty comprehensive, so it might take a few minutes to finish. If tests fail, check the logs for hints; perhaps there are some linting issues or side effects, so try to understand what’s going on; if you’re unable to, you may ask the maintainer.
Be patient. This process takes time. Often, maintainers volunteer their spare time to keep the project alive, so be patient if they take a bit to respond.
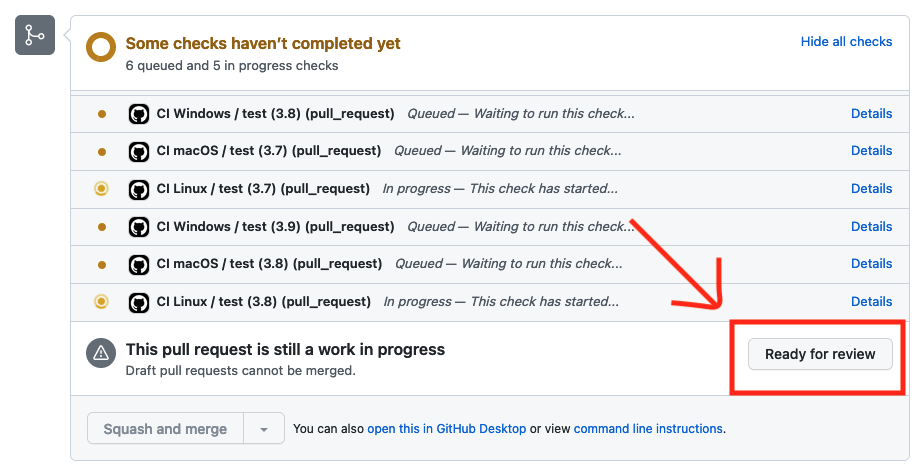
If tests pass, the maintainer will perform a code review, and if everything goes well, they will merge your code! On the other hand, if tests do not pass, you may click on “Details” (see the screenshot above) to check the tests. Take some time to understand why tests are failing - the maintainer will greatly appreciate it if you’re proactive and identify the root cause, fix the tests, and push your changes (pushing new changes will trigger the tests again).
Stay tuned for our next blog post, where we’ll discuss the thought process of contributing with new features and some advanced testing techniques such as using the unittest.mock module and testing CLI applications.
If you’re up for the challenge, apply what you learned today by contributing to Ploomber!
Seamless deployment for data scientists and developers. Ploomber handles infrastructure so you focus on building. Secure and scalable—from personal projects to enterprise apps. Support for Streamlit, Dash, Docker, and AI-powered applications. Because life's too short for deployment headaches.

