


Setting up a Python environment for Data Science is hard. Throughout my projects, I’ve experienced a recurring pattern when attempting to set up Python packages and their dependencies:
conda, venv or virtualenvpip installIn this blog post, you’ll learn how to set up reproducible Python environments for Data Science that are robust across operating systems and guidelines for troubleshooting installation errors.
pip install fail?Most pip install failures are due to missing dependencies. For example, some database drivers such as psycopg2 are just bindings of another library (in this case libpq), if you try to install psycopg2 without having libpq, it will fail. The key is to know which dependencies are missing and how to install them.
Before diving into more details, let’s first give some background on how Python packages are distributed.
There are two primary ways of distributing Python packages (distribution just means making a Python package available to anyone who wants to use it). The first one is a source distribution (.tar.gz files), the second one is a built distribution (.whl files), also known as wheels.
As the name implies, source distributions contain all the source code you need to build a package (building is a prerequisite to installing a package). The recipe to build is usually declared in a setup.py file. This is the equivalent to having all the raw ingredients and instructions for cooking something.
On the other hand, built distributions are generated by having source distributions go through the build process. They are “already cooked” packages whose files only need to be moved to the correct location for you to use them. Built distributions are OS-specific, which means that you need a version compatible with your current operating system. It is the equivalent to having the dish ready and only take it to your table.
There are many nuances to this, the bottom line is that built distributions are easier and faster to install (you just have to move files). If you want to know more about the differences, this is a good place to start. Let’s go back to our pip install discussion.
pip install [package]?When you execute pip install [package], pip will try to find a package with that name in the Python Package Index (or pypi). If it finds the package, it will first try to find a wheel for your OS, if it cannot find it, it will fetch the source distribution. Making wheels available for different OSs is up to the developer, popular packages usually do this, see for example numpy available files on pypi.
pip install will also install any dependencies required by the package you requested; however, it has some limitations and can only install dependencies that can also be installed via pip. It is important to emphasize that these limitations are by design: pip is a Python package manager, it is not designed to deal with non-Python packages.
Since pip is not designed to handle arbitrary dependencies, it will ask the OS for dependencies it cannot install such as compilers (this happens often with Python packages with parts written in C). This implicit process makes environments managed by pip harder to reproduce: if you take your requirements.txt to a different system, it might break if a non-Python dependency that existed in the previous environment does not exist in the new one.
Given that pip install [package] triggers the installation of [package] plus all its dependencies it has to fetch (built or source) distributions for all of them and depending on how many and in which format these are obtained (built distributions are easier to install), the process will vary.
Sometimes Python packages need other non-Python packages to build. As I mentioned before, packages that have C code need a compiler (such as gcc) at build time, once C source code is compiled, gcc is no longer needed, that’s why they are called build dependencies.
Other packages have non-Python dependencies to run, for example, psycopg2 requires the PostgreSQL library libpq to submit queries to the database. This is called a runtime dependency.
This difference leads to the following:
.tar.gz file) you need build + runtime dependencies.whl file) you only need runtime dependenciespip install just install all dependencies for me?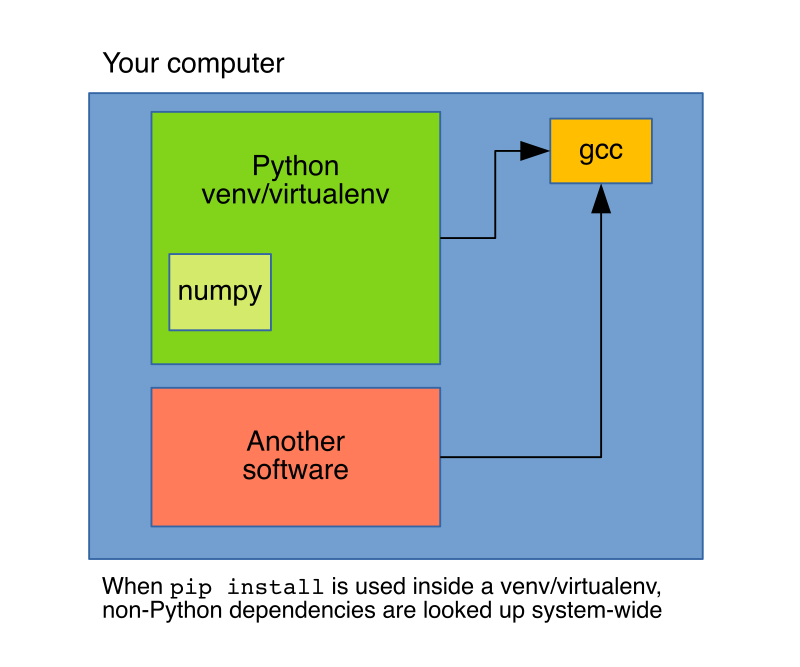
pip’s purpose is to handle Python dependencies, hence, installing things such as a compiler is out of its scope, and it will just request them to the system. These limitations are well-known, which is the reason why conda exists. conda is also a package manager, but unlike pip, its scope is not restricted to Python (for example, it can install the gcc compiler), this makes conda install more flexible since it can handle dependencies than pip cannot.
Note: when we refer to conda, we mean the command-line tool (also known as miniconda), not to the whole Anaconda distribution. This is true for the rest of this article. For an article describing some conda misconceptions, click here.
conda install [package] for robust installations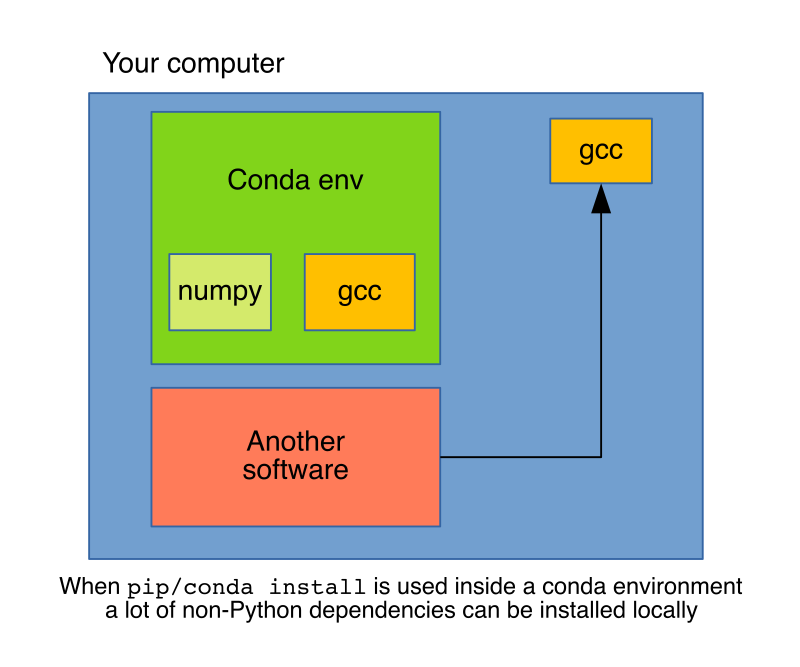
But conda is not only a package manager but an environment manager as well, this is key to understand the operational difference between pip install and conda install. When using pip, packages will install in the current active Python environment, whatever that is. This could be a system-wide installation or, more often, a local virtual environment created using tools such as venv or vitualenv, but still, any non-Python dependencies will be requested to the system.
In contrast, conda is a package manager and an environment manager, using conda install will install dependencies in the current local conda environment, at first glance, conda is very similar to using pip + venv, but conda can install non-Python dependencies, which provides a higher level of isolation.
conda installThere are a few downsides to using conda, though. For conda install [package] to work, someone has to write a conda recipe; sometimes developers maintain these recipes but other times recipe maintainers are third-parties, in such case, they might become outdated and conda install will yield an older version than pip install. Fortunately, well-known packages such as numpy, tensorflow or pytorch, have high-quality recipes and installation through conda is reliable.
The second downside is that many packages are not available in conda, which means we have no option but to use pip install, fortunately, with a few precautions we can safely use it inside a conda environment. The conda + pip combination, gives a robust way of setting up Python environments.
Note: there is a way to access more packages when using conda install by adding channels, which are locations where conda searches for packages. Only add channels from sources you trust. The most popular community-driven channel is conda-forge.
pip install and conda install inside a conda environmentAt the time of writing, using pip inside a conda environment has a few problems, you can read the details here. Since sometimes we have no other way but to use pip to install dependencies not available through conda, here’s my recommended workflow:
conda installpip installenvironment.yml file and pip dependencies using a requirements.txt (See note below)If you follow this procedure, anyone looking to reproduce your results only needs two files: environment.yml and requirements.txt.
Note: The reason I recommend keeping a manual list is to be conscious about each dependency, if we decide to experiment with some library but end up not using it, it is a good practice to remove it from our dependencies. If we rely on auto-generated files such as pip freeze we might end up including dependencies that we don’t need.
While using conda is a more reliable way to install packages with complex dependencies, there is no guarantee that things will just work; furthermore, if you need a package only available through pip via a source distribution, you are more likely to encounter installation issues. Here are some examples of troubleshooting installation errors.
Note: All the following tests were performed using a clean Ubuntu 18.04.4 image with miniconda3
impylaWhen we try to install impyla (an Apache Hive driver) using pip install impyla, we get a long error output. When fixing installation issues is important to skim through it to spot the missing dependency, these are the important lines:
unable to execute 'gcc': No such file or directory
error: command 'gcc' failed with exit status 1
----------------------------------------
ERROR: Failed building wheel for bitarray

...
...
...


unable to execute 'gcc': No such file or directory
error: command 'gcc' failed with exit status 1
----------------------------------------
ERROR: Failed building wheel for thriftpy2
bitarray and thriftpy2 are impyla dependencies. Wheels are not available, hence pip had to use source distributions, we can confirm this in the first output lines (look at the .tar.gz extension):
Collecting bitarray
  Downloading bitarray-1.2.1.tar.gz (48 kB)
     |################################| 48 kB 5.6 MB/s
Collecting thrift>=0.9.3
  Downloading thrift-0.13.0.tar.gz (59 kB)
     |################################| 59 kB 7.7 MB/s
But why did these dependencies fail to install? We see in the log that both dependencies tried to use gcc but they could not find it. Installing it (e.g. apt install gcc) and trying pip install impyla again fixes the issue. But you can also do conda install impyla which has the advantage of not installing gcc system-wide. Using conda is often the easiest way to fix installation issues.
pycopg2Let’s first see what happens with pip install psycopg2:
Error: pg_config executable not found.
As in the previous case, we are missing one dependency. The tricky part is that pg_config is not a standalone executable; it is installed by another package, which is what you’ll find after some online digging. If using apt, you can get this to work by doing apt install libpq-dev before using pip. But again, conda install psycopg2 works out of the box. This is the output:
krb5               pkgs/main/linux-64::krb5-1.16.4-h173b8e3_0
libpq              pkgs/main/linux-64::libpq-11.2-h20c2e04_0
psycopg2           pkgs/main/linux-64::psycopg2-2.8.4-py36h1ba5d50_0
We see that conda will install libpq along with psycopg2, but unlike using a system package manager (e.g. apt), it will do it locally, which is good for isolating our environment.
numpyNumpy is one most widely used packages. pip install numpy works reliably since developers upload wheels for the most popular operating systems. But this doesn’t mean using pip is the best we can do.
Taken from the docs:
NumPy does not require any external linear algebra libraries to be installed. However, if these are available, NumPy’s setup script can detect them and use them for building.
In other words, depending on the availability of external linear algebra libraries, your numpy installation will be different. Let’s see what happens when we run conda install numpy:
package                    |            build
---------------------------|-----------------
blas-1.0                   |              mkl           6 KB
intel-openmp-2020.0        |              166         756 KB
libgfortran-ng-7.3.0       |       hdf63c60_0        1006 KB
mkl-2020.0                 |              166       128.9 MB
mkl-service-2.3.0          |   py36he904b0f_0         219 KB
mkl_fft-1.0.15             |   py36ha843d7b_0         155 KB
mkl_random-1.1.0           |   py36hd6b4f25_0         324 KB
numpy-1.18.1               |   py36h4f9e942_0           5 KB
numpy-base-1.18.1          |   py36hde5b4d6_1         4.2 MB
------------------------------------------------------------
                                       Total:       135.5 MB
Along with numpy, conda will also install mkl, which is a library for optimizing math routines in systems with Intel processors. By using conda install, you get this for free, if using pip, you’d only get a vanilla numpy installation.
Containerization technologies such as Docker provide a higher level of isolation than a conda environment, but I think they are used in Data Science projects earlier than they should be. Once you have to run your pipeline in a production environment, containers are a natural choice, but for development purposes, a conda environment goes a long way.
Getting a Python environment up and running is an error-prone process, and nobody likes spending time fixing installation issues. Understanding the basics of how Python packages are built and distributed, plus using the right tool for the job is a huge improvement over trial and error.
Furthermore, it is not enough to set up our environment once, if we want others to reproduce our work or make the transition to production simple, we have to ensure that there is an automated way to set up our environment from scratch, including environment creation as part of our testing process will let us know when things break.
Seamless deployment for data scientists and developers. Ploomber handles infrastructure so you focus on building. Secure and scalable—from personal projects to enterprise apps. Support for Streamlit, Dash, Docker, and AI-powered applications. Because life's too short for deployment headaches.

