


This blog takes you through the process of building a full-stack application with a Retrieval Augmented Generation (RAG) pipeline from video content, complemented by an intuitive user interface.
Retrieval Augmented Generation is a methodology that merges information retrieval and language generation. In simpler terms, RAG systems first search for relevant information in a given database (like documents, images, or videos) and then use this retrieved data to generate informative and context-relevant text. This approach is particularly useful for building applications that require nuanced understanding and generation of human-like text, based on a large repository of information.

In this blog, we will build a RAG pipeline that takes video content as input and can answer questions about it. We build an indexing pipeline by converting video files into audio, chunking them, and transcribing them using the Whisper API from OpenAI. We then vectorize the transcriptions and store them into a database. We will then build a retriever pipeline with an LLM that can fetch the appropriate information when asked. This allows the application to tap into rich multimedia content and leverage it for text generation tasks. We will build the indexing and retrieval pipelines using Haystack by deepset using their Beta 2.0 version
Our goal is to build a easy-to-use user interface that enables a user to ask questions about a collection of videos. The front end of our application allows users ask questions about a curated database of video content. The application then uses the RAG pipeline to generate answers to these questions. The user interface is built using Solara, an open-source library that lets you use and build data-focused web apps (data apps) using reusable UI components.
We will package our application into .py scripts, a Dockerfile and a requirements.txt file. We will then deploy it on Ploomber Cloud through their command line interface. With Ploomber Cloud, we can easily deploy our application on the cloud and share it with others, we can manage secrets and automate deployments through GitHub actions.
Handling longer videos or a large collection of videos can be challenging and also time consuming. Whereas we can easily build an in-memory vector database for a short video, to more appropriately handle longer videos or a large collection of videos, we will need to use a database that can scale to large amounts of data. We will use ElasticSearch for this purpose. We will also decouple the indexing and retrieval pipelines to make them more scalable.
This application answers questions about Mars Perseverance Rover. You can find a deployed app here.
The source code for this application can be found here
We build using a virtual environment with Python 3.10 and install the following packages:
conda create --name myenv python=3.10
conda activate myenv
pip install haystack-ai elasticsearch-haystack moviepy pydub
We will also need to ensure we have ffmpeg installed on our system. For more information, see:
You will also need to have a Docker client installed on your system. For more information, see here.
We will use the moviepy library to convert video files to audio. We will also use the pydub library to split the audio files into chunks - these chunks are important to meet OpenAI’s Whisper limit. We will use the AudioSegment function to split the audio files into chunks. We will then save the audio chunks. For our application, we will have movie_files/, audio_files/ and chunked audio/ directories to store the video files, audio files and audio chunks respectively.
import moviepy.editor as mp
from pydub import AudioSegment
import math

def create_directories():
    """
    Initialize directories to store video files, audio files and audio chunks
    """
    Path("./movie_files").mkdir(parents=True, exist_ok=True)
    Path("./audio_files").mkdir(parents=True, exist_ok=True)
    Path("./chunked_audio").mkdir(parents=True, exist_ok=True)

def chunk_audio(file_path, chunk_length_ms, output_path):
    """
    Split audio file into chunks of length chunk_length_ms and save them in output_path

    Args:
        file_path (str): path to audio file
        chunk_length_ms (int): length of each chunk in milliseconds
        output_path (str): path to save audio chunks
    """
    audio = AudioSegment.from_file(file_path)
    chunk_length = len(audio)
    num_chunks = math.ceil(chunk_length / chunk_length_ms)
    for i in range(0, num_chunks):
        start = i * chunk_length_ms
        end = start + chunk_length_ms
        chunk = audio[start:end]
        chunk.export(f"./{output_path}/chunk_{i}.mp3", format="mp3")

def convert_video_to_audio(file_name):
    """
    Convert video file to audio file and chunk the audio file

    Args:
        file_name (str): name of video file
    """
    path_to_video = f"./movie_files/{file_name}"
    path_to_audio = f"./audio_files/{file_name.split('.')[0]}.mp3"

    print("Transforming video to audio...")

    # Generate Video File Clip
    clip = mp.VideoFileClip(path_to_video)

    # Generate Audio File
    clip.audio.write_audiofile(path_to_audio)

    # make a directory under chunked_audio with the file_name as the folder name
    Path(f"./chunked_audio/{file_name.split('.')[0]}").mkdir(parents=True, exist_ok=True)

    print("Chunking audio...")
    # Chunk audio file
    chunk_audio(path_to_audio, 180000, f"./chunked_audio/{file_name.split('.')[0]}")
We can execute as follows (note that this assumes that once we have created the directories, we will have the video files in the movie_files/ directory):
create_directories()

file_names = ["my_video_1.mov",
              "my_video_2.mov",
              "my_video_3.mov",
              "my_video_4.mp4",
              "my_video_5.mp4",
              "my_video_6.mp4",
              "my_video_7.mp4"]


# Convert Video to Audio
for file_name in file_names:
    convert_video_to_audio(file_name)
Once the video file has been transformed to audio and chunked, we can build an indexing pipeline that will transcribe the audio to text, vectorize the text, and store the vectors on an ElasticSearch instance. You can initialize an ElasticSearch instance locally using Docker. Alternatively, you can also use a cloud instance through ElasticSearch.
We will use a Docker instance for our ElasticSearch instance and run it locally, however you can also use a cloud instance. We will use the Whisper API from OpenAI to transcribe the audio files. Below is a docker-compose.yml file for our local ElasticSearch instance:
services:
  elasticsearch:
    image: "docker.elastic.co/elasticsearch/elasticsearch:8.11.1"
    ports:
      - 9200:9200
    restart: on-failure
    environment:
      - discovery.type=single-node
      - xpack.security.enabled=false
      - "ES_JAVA_OPTS=-Xms1024m -Xmx1024m"
    healthcheck:
        test: curl --fail http://localhost:9200/_cat/health || exit 1
        interval: 10s
        timeout: 1s
        retries: 10
To initialize the ElasticSearch instance, we can run the following command:
docker-compose up
Once that is running, we can build our indexing pipeline as follows. The code below assumes you have stored your OpenAI API key in a .env file in the same directory as your script. The code below contains a complete indexing pipeline that transcribes the audio files, cleans the transcriptions, splits the transcriptions into sentences, vectorizes the sentences and stores them in an ElasticSearch instance.
⚠️ Important Note:
The code below was built using Haystack 2.0 beta version - this version is still under development and it is not suitable for production applications. For more information, visit https://docs.haystack.deepset.ai/v2.0/docs/intro.
The key steps in an indexing pipeline are:
With Haystack 2.0, these steps translate as follows:
DocumentStore instance. We will use an ElasticSearch instance for this purpose. We will also initialize a Pipeline instance.RemoteWhisperTranscriber component to transcribe the audio files. We will use the DocumentCleaner component to clean the transcriptions. We will use the DocumentSplitter component to split the transcriptions into sentences. We will use the SentenceTransformersDocumentEmbedder component to vectorize the sentences. We will use the DocumentWriter component to store the vectors in the ElasticSearch instance.transcriber component to the cleaner component. We will connect the cleaner component to the splitter component. We will connect the splitter component to the embedder component. We will connect the embedder component to the writer component.Below is a complete indexing pipeline implementation:
from pathlib import Path
from dotenv import load_dotenv
import os
from haystack import Pipeline
from haystack.components.audio import RemoteWhisperTranscriber
from haystack.components.preprocessors import DocumentSplitter, DocumentCleaner
from haystack.components.writers import DocumentWriter
from haystack.components.embedders import SentenceTransformersDocumentEmbedder
from elasticsearch_haystack.document_store import ElasticsearchDocumentStore
load_dotenv(".env")
openaikey = os.getenv("OPENAI")
# Initialize Document Store
document_store = ElasticsearchDocumentStore(hosts= "http://localhost:9200/")
# Initialize Pipeline components
embedder = SentenceTransformersDocumentEmbedder()
transcriber = RemoteWhisperTranscriber(api_key=openaikey)
documentcleaner = DocumentCleaner()
splitter = DocumentSplitter(split_by="sentence",
split_length=10)
# Build Pipeline
p = Pipeline()
p.add_component(instance=transcriber, name="transcriber")
p.add_component(instance=documentcleaner, name="cleaner")
p.add_component(instance= splitter, name="splitter")
p.add_component(instance=embedder, name="embedder")
p.add_component(instance=DocumentWriter(document_store=document_store), name="writer")
# Connect Pipeline components
p.connect("transcriber.documents", "cleaner.documents")
p.connect("cleaner.documents", "splitter.documents")
p.connect("splitter.documents", "embedder.documents")
p.connect("embedder.documents", "writer.documents")
# Draw Pipeline
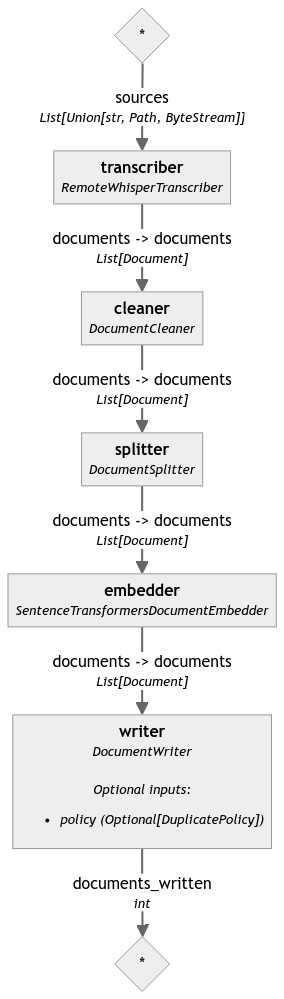
p.draw("indexing_pipeline.png")
# Run indexing Pipeline
audio_files = [str(f) for f in Path("./chunked_audio").rglob("*.mp3")]
p.run({"transcriber": {"sources": audio_files}})
The pipeline can be visualized a directed acyclic graph (DAG). In it, we can see the key steps of an indexing pipeline, starting from transcription using the WhisperAPI entry point, followed by tokenization, vectorization and storage in a document store (in our case with an ElasticSearch instance).
Once the indexing pipeline is executed, we can then use the retriever pipeline to retrieve the relevant information when asked a question. We will learn how to build a retriever pipeline that incorporates an LLM next.
Once we have transformed the video into audio, chunked, and populated our ElasticSearch instance, we can build a retriever pipeline that can answer questions about the video content.
The key steps of a retriever pipeline are:
We will use Haystack once more for our retriever pipeline.
from haystack import Pipeline
from haystack.components.embedders import SentenceTransformersTextEmbedder
from haystack.components.builders.prompt_builder import PromptBuilder
from haystack.components.generators import GPTGenerator
from elasticsearch_haystack.embedding_retriever import ElasticsearchEmbeddingRetriever
from elasticsearch_haystack.document_store import ElasticsearchDocumentStore
from dotenv import load_dotenv
import os
load_dotenv(".env")
openaikey = os.getenv("OPENAI")
# Build RAG pipeline
print("Initializing QA pipeline")
prompt_template = """\
Use the following context to answer the user's question in a friendly manner. \
If the context provided doesn't answer the question - \
please respond with: "I don't know".
### CONTEXT
{% for doc in documents %}
{{ doc.content }}
{% endfor %}
### USER QUESTION
{{query}}
"""
document_store = ElasticsearchDocumentStore(hosts= "http://localhost:9200/")
prompt_builder = PromptBuilder(prompt_template)
############################################
query_embedder = SentenceTransformersTextEmbedder()
#retriever = InMemoryEmbeddingRetriever(document_store=document_store, top_k=2)
retriever = ElasticsearchEmbeddingRetriever(document_store=document_store)
llm = GPTGenerator(api_key=openaikey)
pipeline = Pipeline()
pipeline.add_component(instance=query_embedder, name="query_embedder")
pipeline.add_component(instance=retriever, name="retriever")
pipeline.add_component(instance=prompt_builder, name="prompt_builder")
pipeline.add_component(instance=llm, name="llm")
pipeline.connect("query_embedder.embedding", "retriever.query_embedding")
pipeline.connect("retriever.documents", "prompt_builder.documents")
pipeline.connect("prompt_builder", "llm")
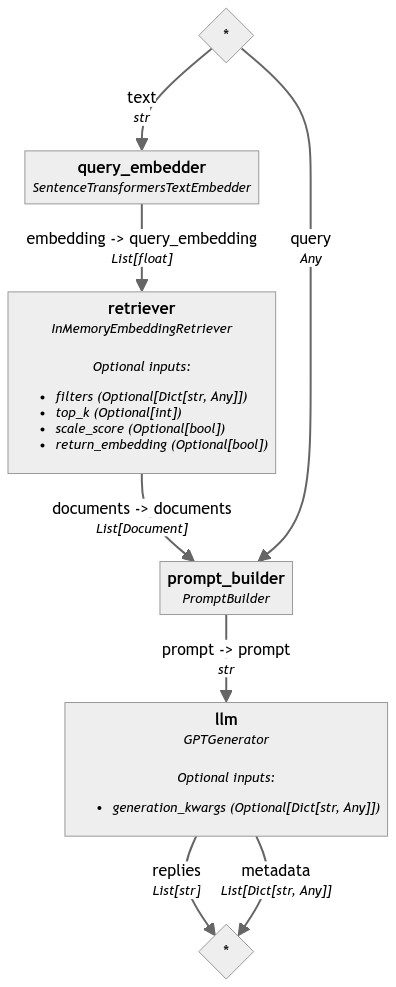
pipeline.draw("retriever_pipeline.png")
To execute our pipeline, we can run the following:
input_text = "Summarize the topics discussed in the documents"
pipeline.run(data={"query_embedder": {"text": input_text}, "prompt_builder": {"query": input_text}})
We can visualize our retriever pipeline as follows:
We are now ready to build a user interface for our RAG pipeline. We will use Solara for this purpose.
Solara is an open-source library that lets you use and build data-focused web apps (data apps) using reusable UI components. One key feature of Solara is its applications building reactive applications. Reactive applications are applications that respond to user input in real-time. This is particularly useful for applications that require a user to interact with the application in real-time.
We will build a reactive application that allows a user to ask questions about a curated database of video content (our ElasticSearch instance). The application will then use the retriever pipeline to generate answers to these questions.
With our myenv virtual environment active, we can install Solara as follows
pip install solara
Solara has a number of key components that we will use to build our application. These include:
State management - we can define our application’s state management by defining a State class. We will use this to define the state of our application. In our case, we want to manage the state of the user’s question (input).
Solara components - we can use Solara’s @solara.component decorator to define the functionality and layout of our application.
We will begin by making relevant imports and defining the state of our application. We will define the state of our application using a State class. Our initial state assumes that the user has not asked a question yet. We will also define a Message class and a ChatBot function. We will use the Message class to define the messages that will be displayed in our chatbot. We will use the ChatBot function to define the layout of our chatbot. To personalize the application, we will add an assistant and user logos.
import solara
from dataclasses import dataclass

class State:
    input = solara.reactive("")

@dataclass
class Message:
    role: str
    content: str

def ChatBox(message: Message) -> None:
    solara.Style(chatbox_css)

    align = "start" if message.role == "assistant" else "end"
    with solara.Column(align=align):
        with solara.Card(classes=["message", f"{message.role}-message"]):
            if message.content:
                with solara.Card():
                    solara.Markdown(message.content)


        # Image reference: https://www.flaticon.com/free-icons/bot;
        #                  https://www.flaticon.com/free-icons/use

        with solara.HBox(align_items="center"):
            image_path = Path(f"static/{message.role}-logo.png")
            solara.Image(str(image_path), classes=["avatar"])
            solara.Text(message.role.capitalize())
We will now define the functionality of our application using Solara components. We will define the functionality of our application using the @solara.component decorator. We will define a Chat component that will allow the user to ask questions about the video content using our retriever pipeline. The chat component is composed of an assistant and a user. The assistant will respond to the user’s questions using our retriever pipeline.
@solara.component
def Chat() -> None:
    solara.Style(
        """
        .chat-input {
            max-width: 800px;
        })
    """
    )

    messages, set_messages = solara.use_state(
        [
            Message(
                role="assistant",
                content=f"Welcome. Please post your queries!"
            )
        ]
    )
    input, set_input = solara.use_state("")

    def ask_rag(pipeline):
        try:
            input_text = State.input.value
            _messages = messages + [Message(role="user", content=input_text)]
            set_input("")
            State.input.value = ""
            set_messages(_messages)

            result = pipeline.run(data={"query_embedder": {"text": input_text}, "prompt_builder": {"query": input_text}})
            rag_response = result['llm']['replies'][0]

            set_messages(_messages + [Message(role="assistant", content=rag_response)])

        except Exception as e:
            set_messages(_messages + [Message(role="assistant", content="Cannot answer your current question. Please try again")])

    with solara.VBox():
        for message in messages:
            ChatBox(message)

    with solara.Row(justify="center"):
        with solara.HBox(align_items="center", classes=["chat-input"]):
            solara.InputText(label="Query", value=State.input, continuous_update=False)

    if State.input.value:
        ask_rag(pipeline)
We will now define the layout of our application. We will define a Page component and a Layout component that will define the layout of our application. We will use the Chat component we defined earlier to define the layout of our application. We will also add a title to our application.
@solara.component
def Page():

    with solara.AppBarTitle():
        solara.Text("Deepen your understanding of our video collection through a Q&A AI assistant")

    with solara.Card(title="About", elevation=6, style="background-color: #f5f5f5;"):
        solara.Markdown("Ask questions about our curated database of video using advanced AI tools.")

    solara.Style(css)
    with solara.VBox(classes=["main"]):
        solara.HTML(
            tag="h3", style="margin: auto;", unsafe_innerHTML="Chat with the assistant to answer questions about the video topics"
        )

        Chat()

@solara.component
def Layout(children):
    route, routes = solara.use_route()
    return solara.AppLayout(children=children)
We can easily run our application from the terminal as follows:
solara run app.py --host=0.0.0.0 --port=80
This will trigger a window to be open on our browser via the address: http://0.0.0.0:80. This is what the application looks like:

You can visit Elastic Cloud to set up a cloud-based ElasticSearch instance. You can also use a cloud-based ElasticSearch instance from AWS or Azure.
You can then update the document_store variable in the indexing pipeline to point to your cloud-based ElasticSearch instance. For more information, review Haystack’s ElasticSearch integration page as well as ElasticSearch Haystack API documentation.
We will now package our application into .py scripts, a Dockerfile and a requirements.txt file. We will then deploy it on Ploomber Cloud through their command line interface. With Ploomber Cloud, we can easily deploy our application on the cloud and share it with others, we can manage secrets and automate deployments through GitHub actions.
FROM python:3.11

COPY app.py app.py
COPY .env .env
COPY requirements.txt requirements.txt
COPY static/ static/
RUN pip install -r requirements.txt

ENTRYPOINT ["solara", "run", "app.py", "--host=0.0.0.0", "--port=80"]
In this case app.py contains code with the retriever pipeline and the Solara functionality. We will also need to create a .env file with our OpenAI API key. We will also need to create a requirements.txt file with the following packages:
haystack-ai
elasticsearch-haystack==0.1.2
solara
openai
python-dotenv
You will need to create an account on Ploomber Cloud. You can do so here. You will also need to generate an API key on Ploomber Cloud under ‘Account’ in https://www.platform.ploomber.io/ You will also need to install the Ploomber Cloud CLI. You can do so as follows:
pip install ploomber-cloud
Connect your local computer to your Ploomber Cloud account by running the following command:
ploomber-cloud key
Paste your API key when prompted. You can then initialize your deployment as follows:
ploomber-cloud init
This will create a ploomber-cloud.json file in your current directory. It will have your app id and the type (docker).
You can deploy your application as follows:
ploomber-cloud deploy
This will deploy your application on the cloud. You can then access your application via the URL provided in the output of the command above.
Seamless deployment for data scientists and developers. Ploomber handles infrastructure so you focus on building. Secure and scalable—from personal projects to enterprise apps. Support for Streamlit, Dash, Docker, and AI-powered applications. Because life's too short for deployment headaches.

