If you’re developing Streamlit applications for more than a handful of users, you’ll likely encounter scalability problems: sessions crashing and unresponsive applications are signs that your app is struggling to handle the load. These issues often arise when computationally intensive tasks are performed within the Streamlit app itself, blocking the main thread and affecting the user experience.
In this blog post, we’ll explore how to scale a Streamlit app using a task queue. We’ll provide you with a ready-to-use template that will allow you to scale your Streamlit applications easily.
We’ll implement a solution using Redis as our message broker and RQ (Redis Queue) as our task queue. We’ll also use Docker to containerize our application, making it easy to deploy and scale. This guide does not assume any experience with Redis, RQ, or Docker. By the end of this post, you’ll have a scalable Streamlit app architecture that can handle computationally intensive tasks without compromising the user experience.
If you need help scaling a Streamlit application, contact us.
If you want to skip the technical details and see it up and running, go to the deployment section
The problem
In a typical Streamlit application, you might see something like this:
if st.button("Do something"):
    result = expensive_computation()
    st.write(result)
However, this approach has significant drawbacks for computationally intensive tasks or high user loads:
- Blocking execution: The app becomes unresponsive while
expensive_computation()runs. - Resource consumption: Multiple concurrent computations can overload the server.
- Scalability issues: The server may struggle with increasing user numbers.
- Poor user experience: Users must wait for computations to finish before interacting.
For example, if expensive_computation() takes 30 seconds and 10 users trigger it simultaneously:
- The server runs 10 heavy computations at once.
- Each user’s browser freezes for at least 30 seconds.
- Server resources spike dramatically.
- The server might crash or throw out-of-memory errors.
A task queue solves these issues by offloading computations to separate worker processes, keeping the app responsive. Here’s how:
- Concurrency control: The queue limits simultaneous tasks, preventing memory overload. For example, with 3 workers, only 3 tasks run concurrently, regardless of user requests.
- Scalability: We can easily add more workers to handle increased load without changing the app code.
- Better user experience: The app stays responsive while tasks run in the background.
This approach decouples task execution from the user interface, creating a more robust and scalable application.
Setup
Our setup will consist of the following components:
- Streamlit app: This serves as the user interface, handling user interactions and displaying results.
- Redis server: Acts as a message broker, facilitating communication between different parts of our application.
- RQ (Redis Queue) workers: These are background processes that handle computationally intensive tasks asynchronously.
- Supervisor: A process control system that manages and monitors our application processes.
We’ll examine two crucial configuration files:
Dockerfile: This defines the container image, specifying the environment and dependencies required for our application.supervisord.conf: This configuration file instructs Supervisor on how to manage our processes, including the Streamlit app, Redis server, and RQ workers.
We’ll dive into each of these components, explaining their roles and how they interact to create a scalable Streamlit application architecture. Before going into the task queue details, let’s see at a high level, how our Streamlit app looks like.
Streamlit app
In this section, we’ll highlight the most important components of our application. Our app is divided into three sections:
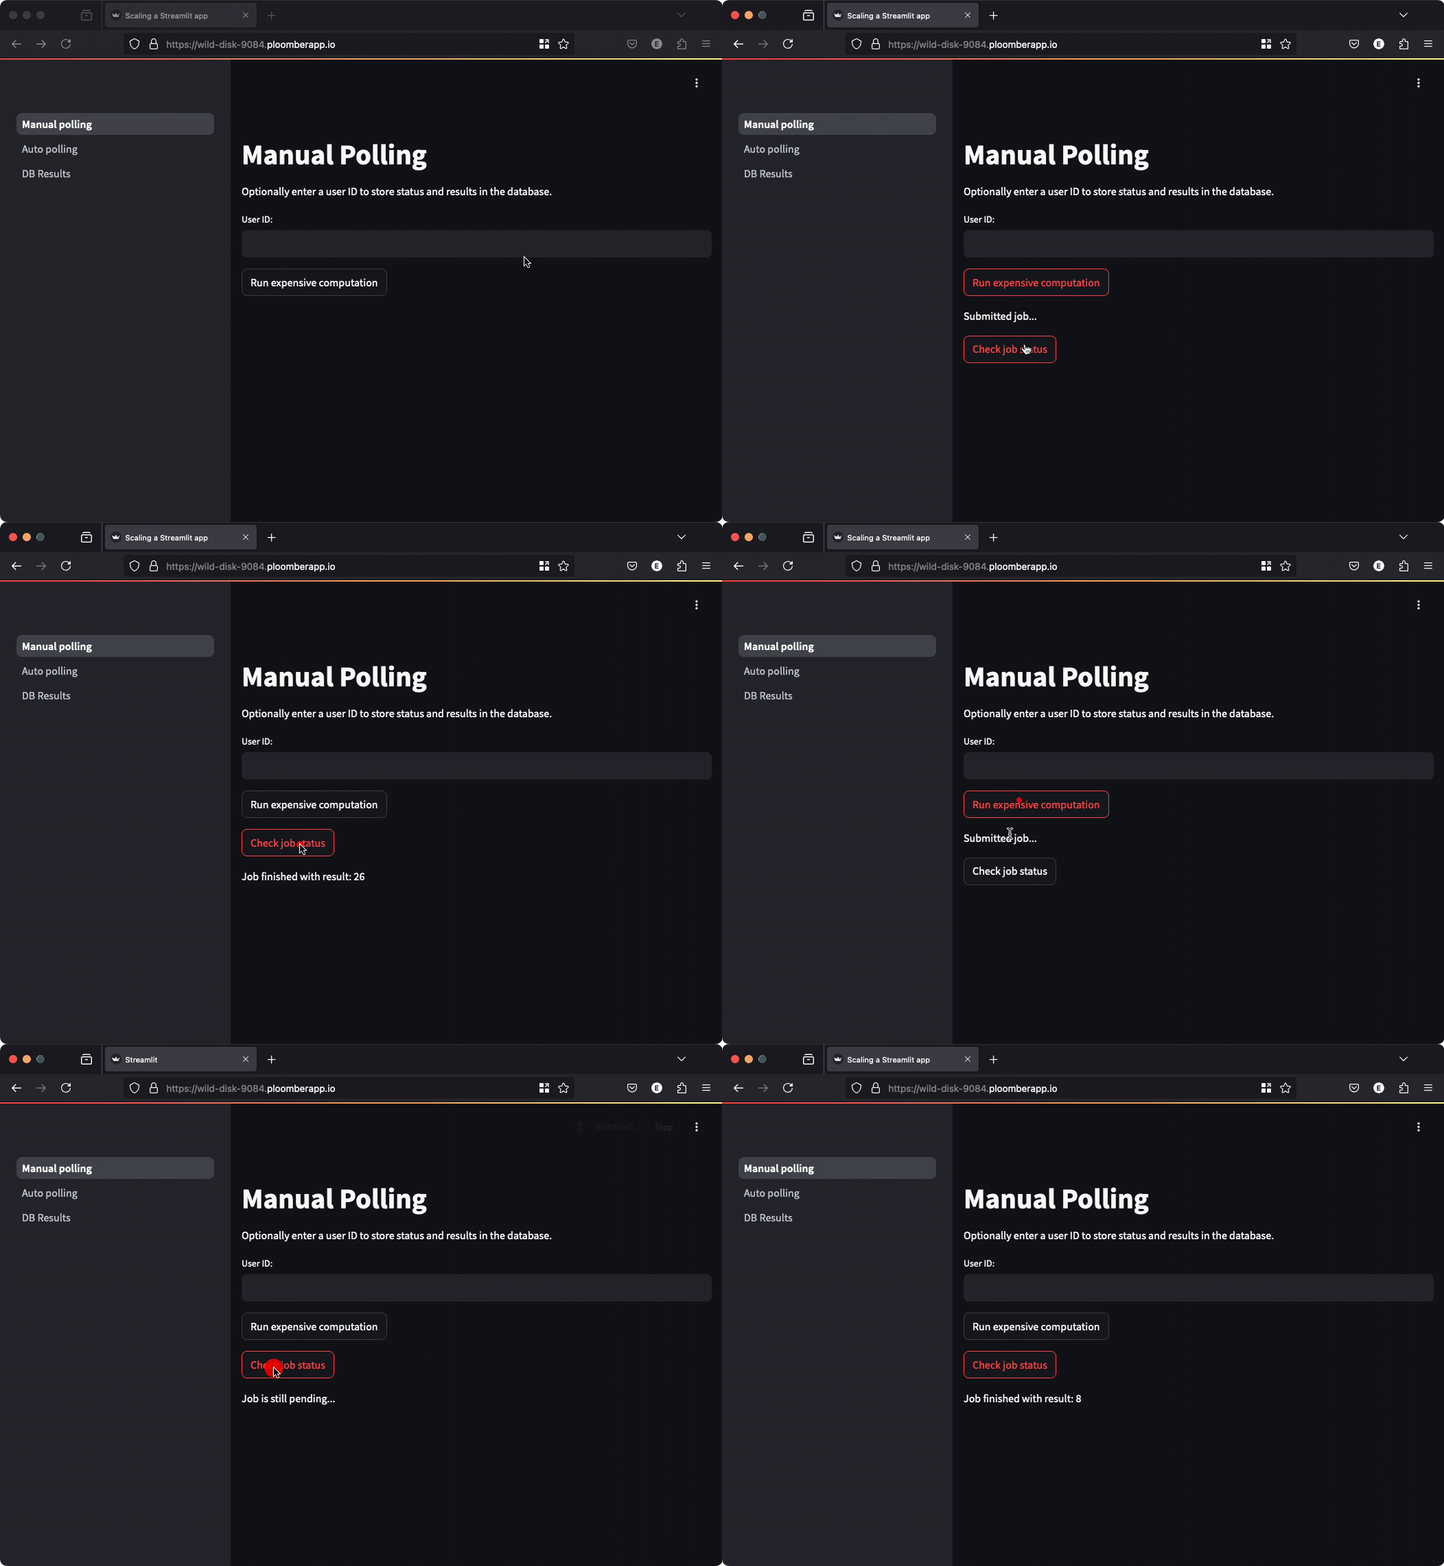
- Manual polling: Users initiate a task and manually check its status by clicking a button.
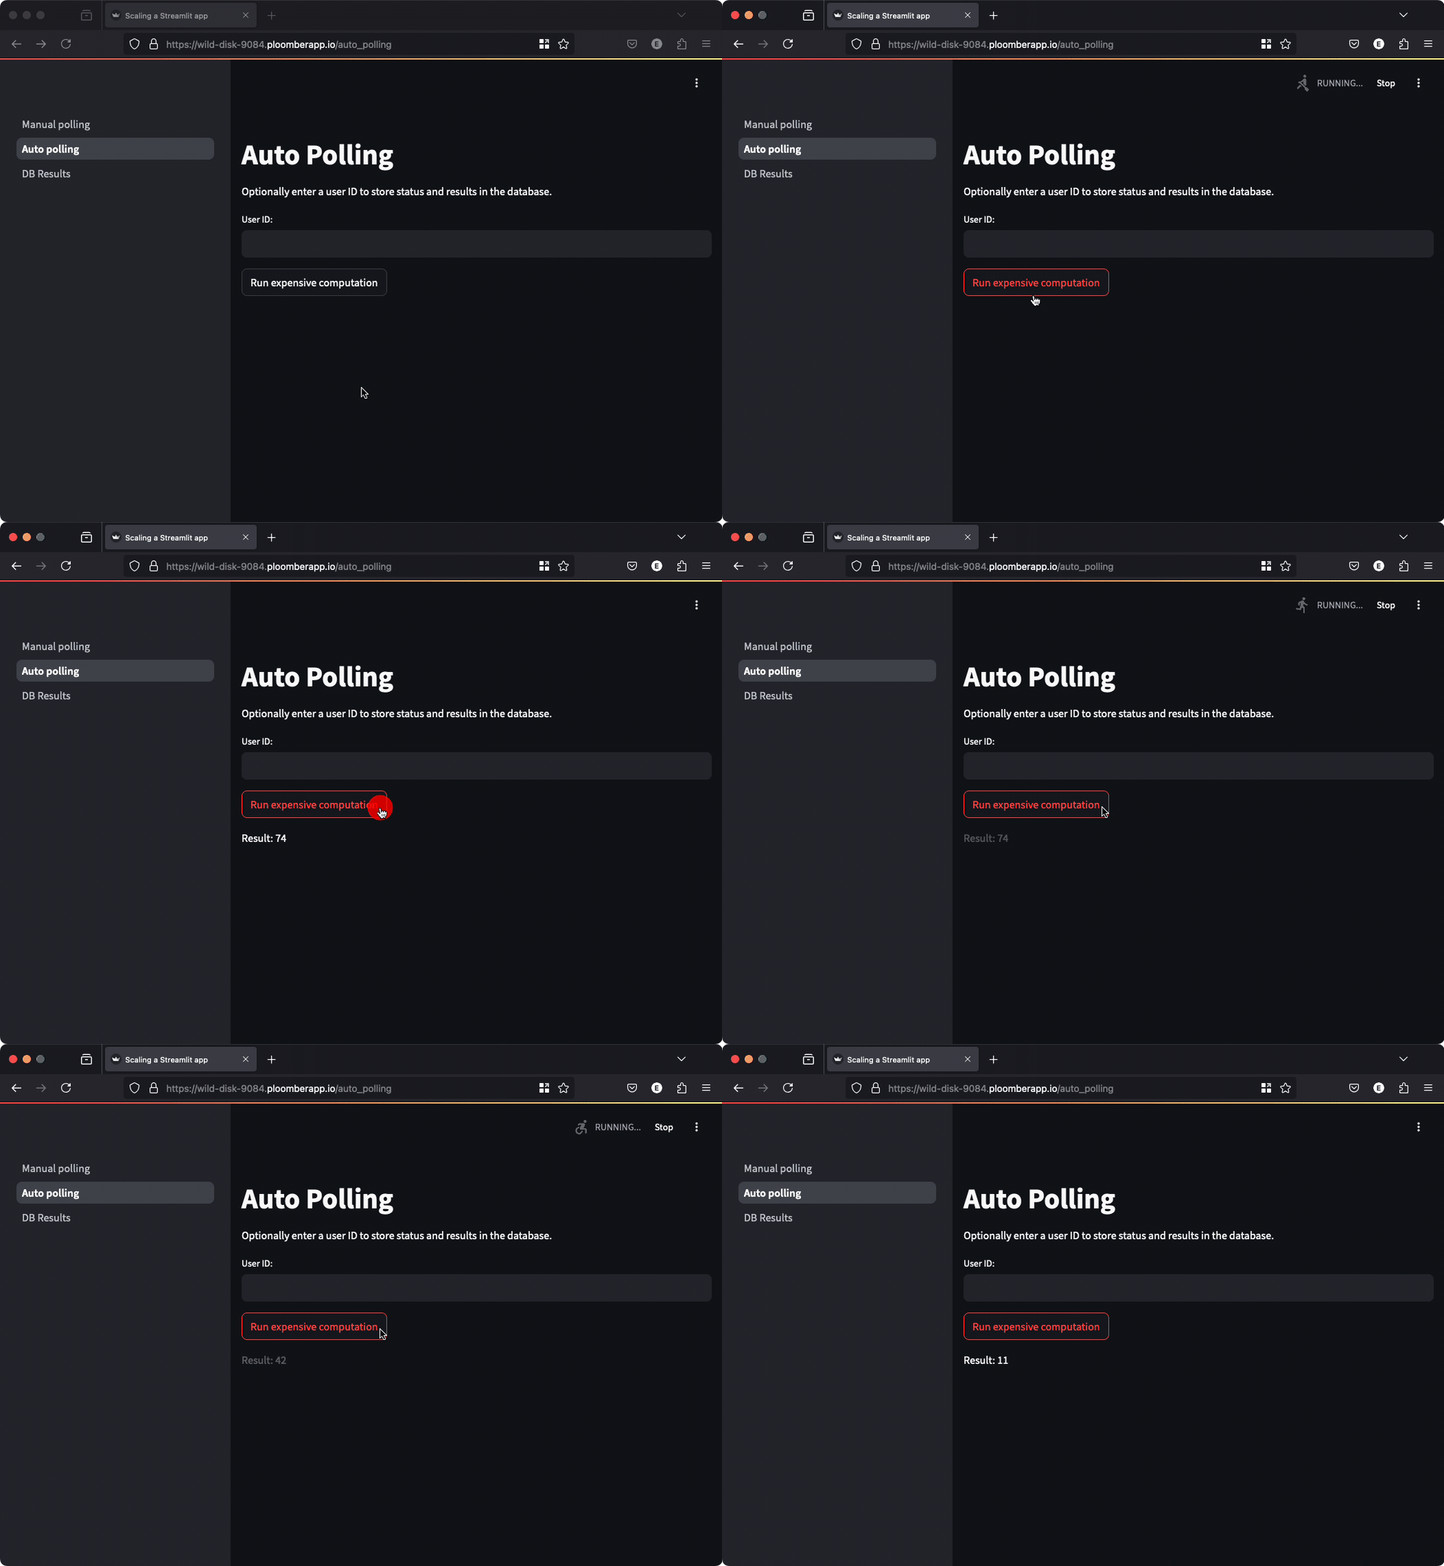
- Automatic polling: The app automatically checks the task status and updates the user.
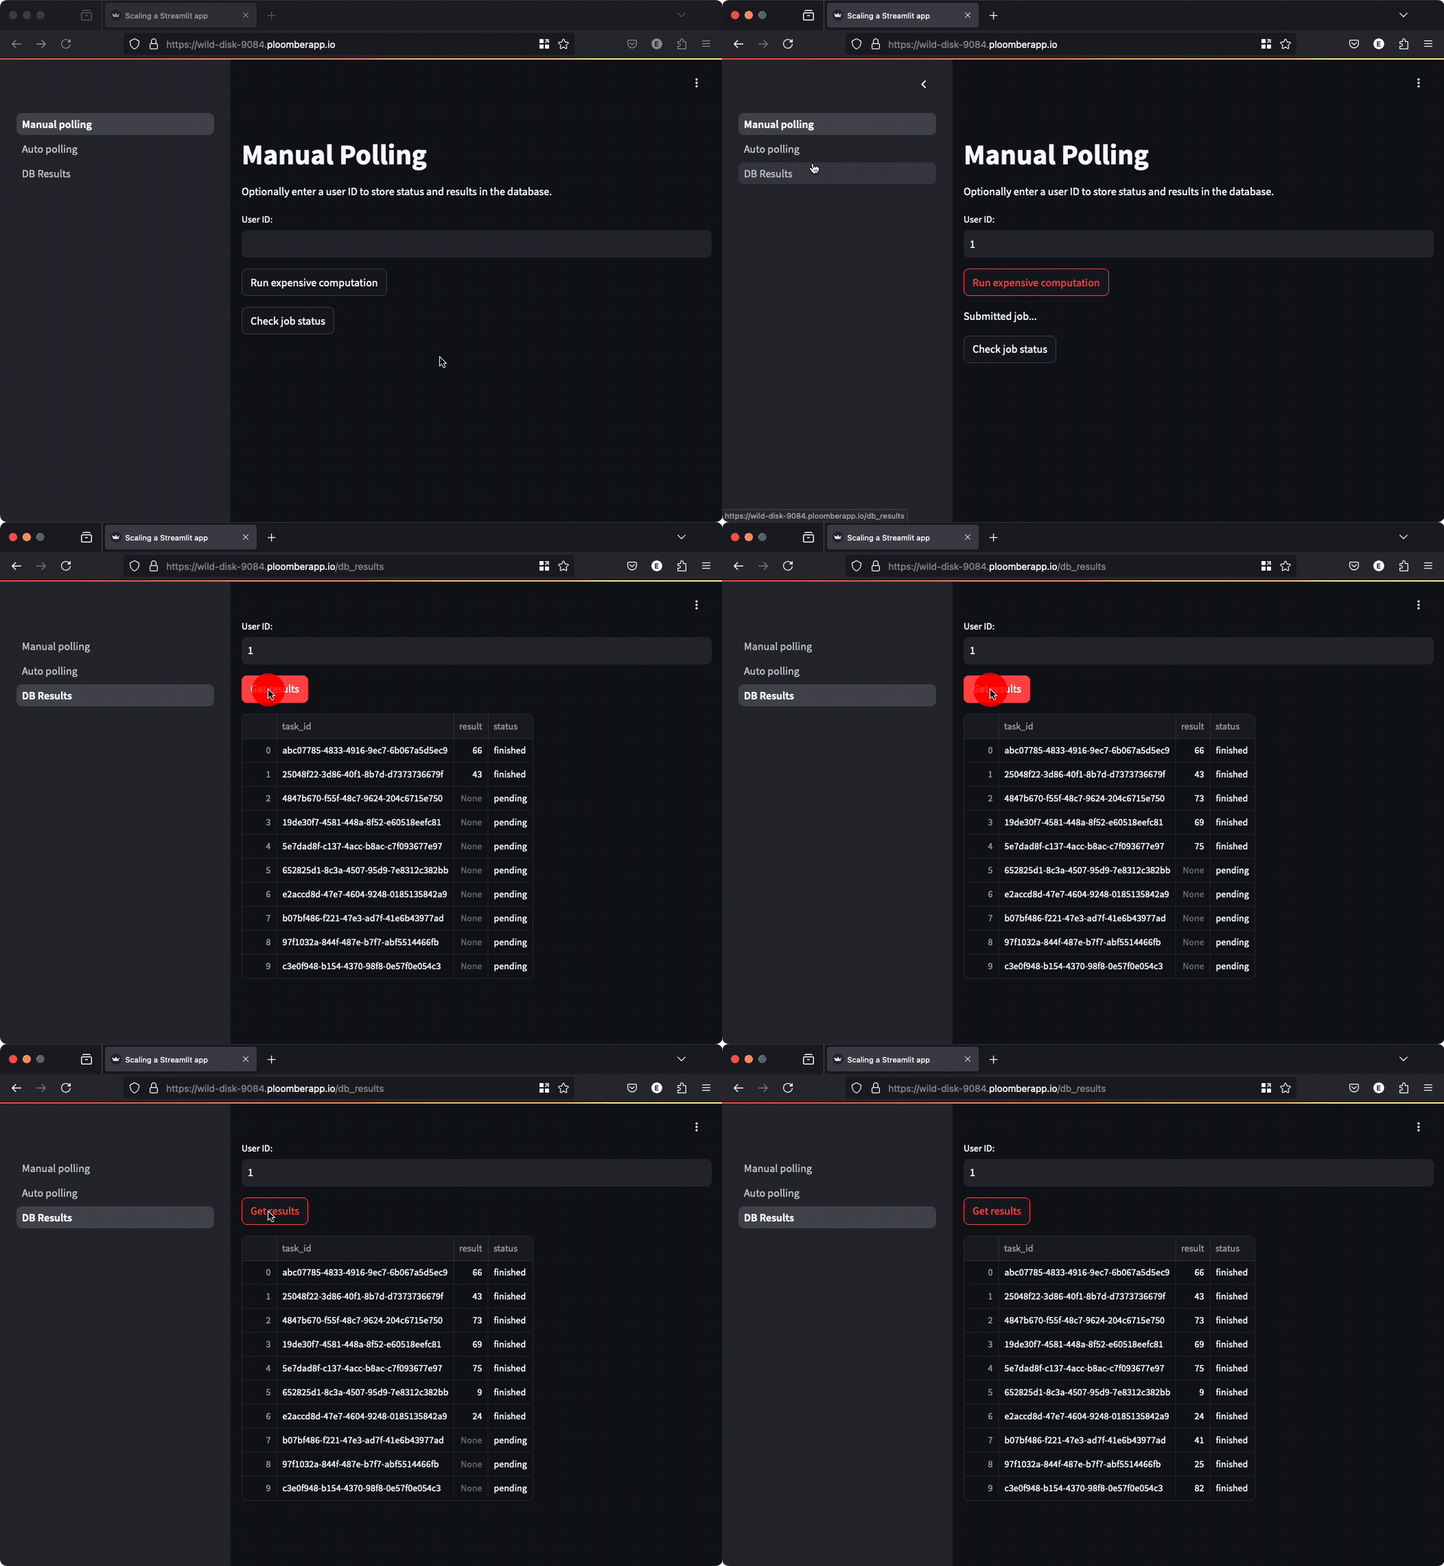
- Database integration: Results are retrieved from a database.
Let’s examine each of these components in detail.
Manual polling

In this approach, running our function returns a task ID, which we can use to retrieve its status, the code looks like this:
if st.button("Run expensive computation"):
    job_id = tasks.enqueue_task(functions.expensive_computation)
    st.write("Submitted job...")
    st.session_state["job_id"] = job_id

if st.session_state.get("job_id") and st.button("Check job status"):
    # check the task status and print the result if available
This approach keeps the user interface fully functional while waiting for the task; however, users need to click a button to get the result. Manual polling is ok when your task takes so much time that it doesn’t make sense for users to keep looking at the screen: they can come back later and check the results.
However, if you want to automatically show the results to the user, you can perform automated polling.
Automatic polling

In this case, we perform the polling on behalf of the user and display the result as soon as it’s ready:
if st.button("Run expensive computation"):
    # this function will finish execution until the computation is finished
    result = tasks.run_until_complete(functions.expensive_computation)
    st.write(f"Result: {result}")
At first, this looks similar to the vanilla approach that we described
earlier. However, our tasks.run_until_complete function will submit
the task to the queue, limiting concurrency and preventing the app from crashing
when many users click the button at the same time.
Storing results in a DB

In some situations, you might want to persist results so users can come back at any
time and check them out. The demo application shows you how. You can go to any
of the first two sections (manual polling or automated polling), enter a User ID (can
be any number), and submit a job. Then, move to the DB Results section, enter the
User ID and click the button to retrieve the results, you’ll be able to track the
status and results (if they’re finished), click again to see the newest results.
Since results are persisted in a database, users can close the browser and come back at any time to review the results.
Note: In a production scenario, you’ll get the user ID from the authentication mechanism, as opposed to having users manually enter it.
Dockerfile
Let’s review the important parts of the Dockerfile. These lines install the two
packages we need: supervisor and redis:
RUN apt-get update && \
    apt-get install -y \
    supervisor redis-server \
    && rm -rf /var/lib/apt/lists/*
Then, we install streamlit and rq. rq is the package that allows us to submit
and process jobs. We also install our app’s dependencies:
RUN pip install streamlit rq

COPY requirements.txt /app/
RUN pip install -r /app/requirements.txt --no-cache-dir
Then, we copy Supervisor’s configuration file and our source code:
COPY supervisord.conf /etc/supervisord.conf
COPY . /app/
Finally, we start Supervisor, which is the program that we’ll ensure that our app, and the task queue run correctly:
CMD ["/usr/bin/supervisord", "-c", "/etc/supervisord.conf"]
supervisord.conf
supervisord.conf is a configuration file where we tell Supervisor how to start
our application, there is one section for Streamlit, another one for Redis and one
more for the RQ Worker. Redis allows us to communicate our Streamlit app with the RQ
worker, and the RQ worker is a Python process that executes tasks.
[program:streamlit]
...

[program:redis]
...

[program:rq_worker]
...
You don’t need to modify the configuration file. It’ll work as-is. As you can see, we have a single RQ worker, which means, we’ll only execute one task at a time. However, if you’re running your Streamlit application in a big server, you can increase the number of workers and the task queue will automatically distribute the load among workers.
Deployment
Option 1: Quick Deploy
Click here to automatically deploy this Streamlit app on Ploomber’s platform.
Option 2: Manual Deployment
Use the following commands to deploy the application (source code here):
# install ploomber cloud cli
pip install ploomber-cloud

# download example
ploomber-cloud examples streamlit/scaling-streamlit
cd scaling-streamlit
Note that you’ll need a Ploomber Cloud account to continue:
# initialize the project
ploomber-cloud init

# deploy
ploomber-cloud deploy
After a few minutes, you’ll have the application up and running!


