


Streamlit has become one of the most popular methods to build and share data apps in pure Python. Thanks to its open-source framework, it has been adopted by thousands of data scientists, AI engineers, and software engineers looking to build projects quickly and cleanly. As users have built more and more apps, the need for important features like authentication has been more apparent. Developers want to build apps and host them online, however, they need a reliable way to secure access to those applications.
Currently, Streamlit supports authentication through the streamlit-authenticator package. However, it’s not perfect, as it requires storing login credentials in a YAML file and adding a fair amount of extra code to your project.
Users have requested more robust native support for authentication in Streamlit. As a response, the team recently created proposed plans for expanded native authentication. While promising, we don’t know how long such features might take to implement, and they may not fit certain users' needs.
In the post, the team explicitly mentions that replacing reverse proxy is not a goal of theirs:
Non-goal: Replace the use of reverse proxy in higher security environments
This may be disappointing to those who are looking for the robustness of reverse proxy authentication. As a result, we created this demonstration: a method of authenticating Streamlit app users against a SQLite database. Since it is a proof-of-concept, the code isn’t fully fleshed-out (see: Development notes). More importantly, it serves as a motivating example of the architecture for an authentication system for Streamlit secured behind a reverse proxy.
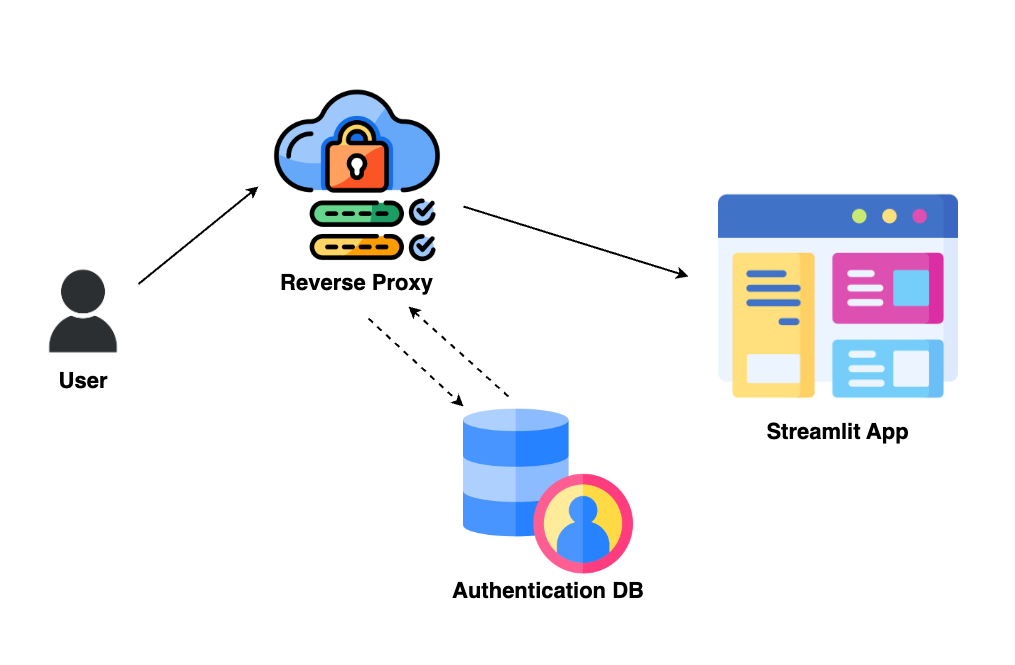
The reverse proxy server sits between the user and your Streamlit application. To access the Streamlit application, the user will first be directed to the reverse proxy server to enter a username and password. The reverse proxy authenticates these credentials against the user database. If the credentials are valid, the user is re-directed to the Streamlit app. The Streamlit app is not directly reachable via the internet, it can only be accessed via the reverse proxy. Now that you understand the general architecture, let’s dive into the demo.
The project consists of a few files:
app.py: your Streamlit appserver-auth.js: reverse proxy authentication servercreate-users.py: script to create user DB with sample credentialsenvironment.yml: dependencies for conda environmentpackage.json: dependencies for reverse proxy serverFor the purposes of this demonstration, everything will run locally. The Streamlit app will run on port 8501 and the reverse proxy on port 5002.
Before getting started, we need to set up a local environment. Here’s the code for environment.yml:
name: streamlit-proxy
channels:
  - conda-forge
  - defaults

dependencies:
  - python=3.11
  - nodejs==20.9.0
  - pip
  - pip:
    - streamlit
Ensure you have conda installed and run:
conda env create -f environment.yml
conda activate streamlit-proxy
Now copy this into package.json:
{
  "name": "streamlit-auth-db",
  "version": "1.0.0",
  "description": "```sh",
  "main": "server-streamlit-auth.js",
  "scripts": {
    "test": "echo \"Error: no test specified\" && exit 1"
  },
  "keywords": [],
  "author": "",
  "license": "ISC",
  "dependencies": {
    "better-sqlite3": "^9.5.0",
    "dotenv": "^16.4.5",
    "express": "^4.19.2",
    "express-basic-auth": "^1.2.1",
    "express-openid-connect": "^2.17.1",
    "http-proxy": "^1.18.1",
    "sqlite3": "^5.1.7"
  }
}
And run:
npm install
We’ll use Express for the reverse proxy server. Express makes setup and routing simple and easy. First we’ll import the necessary packages and do some setup:
const http = require('http');
const express = require('express');
const httpProxy = require('http-proxy');
const basicAuth = require('express-basic-auth');
const Database = require('better-sqlite3');

// Create a proxy server
const proxy = httpProxy.createProxyServer({ secure: false, target: 'http://localhost:8501' });

// Create an express app
const app = express();
Note the line where we create our proxy server:
const proxy = httpProxy.createProxyServer({ secure: false, target: 'http://localhost:8501' });
It uses the httpProxy package and sets the target to the URL where our Streamlit app will run. In this case, its the local port 8501.
Next we’ll create our authorizer and set the app to use basic auth with it.
function myAuthorizer(username, password) {
    const db = new Database('./users.db');
    const row = db.prepare('SELECT * FROM users WHERE username = ?').get(username);

    if (row) {
        // Compare the provided password with the stored password
        const passwordMatches = basicAuth.safeCompare(password, row.password);
        return passwordMatches;
    } else {
        return false;
    }
}

app.use(basicAuth({ authorizer: myAuthorizer, challenge: true }));
The authorizer receives the username and password as parameters then queries the user database for a username match. It uses safeCompare to find a password match, and returns false if no match is found. This implementation is relatively simple since we are storing passwords in plain text. You can change the authorizer function as needed to implement other features such as encryption.
Finally, we set up the routing and run the server. The server will listen for all requests at http://localhost:5002 and direct the requests to the proxy for authentication.
app.all('*', function (req, res) {
    console.log("Request received: " + req.url);
    proxy.web(req, res);
});

const server = http.createServer(app);

server.on('upgrade', function (req, socket, head) {
    proxy.ws(req, socket, head);
});

server.on('connect', async function (req, socket, head) {
    proxy.web(req, socket, head);
});

console.log("Reverse proxy server is running in port 5002");
server.listen(5002);
Note that we listen on upgrade and connect. On any connection, we direct user requests to proxy, which will perform the authentication, then forward users to the target, your Streamlit app. Note that when you’re forwarded to the Streamlit app, the URL won’t change even though it’s running on a different port. This is because we’re still connected through the proxy server. All together, the code looks like this:
server-auth.js
const http = require('http');
const express = require('express');
const httpProxy = require('http-proxy');
const basicAuth = require('express-basic-auth');
const Database = require('better-sqlite3');

// Create a proxy server
const proxy = httpProxy.createProxyServer({ secure: false, target: 'http://localhost:8501' });

// Create an express app
const app = express();

function myAuthorizer(username, password) {
    const db = new Database('./users.db');
    const row = db.prepare('SELECT * FROM users WHERE username = ?').get(username);

    if (row) {
        // Compare the provided password with the stored password
        const passwordMatches = basicAuth.safeCompare(password, row.password);
        return passwordMatches;
    } else {
        return false;
    }
}

app.use(basicAuth({ authorizer: myAuthorizer, challenge: true }));

app.all('*', function (req, res) {
    console.log("Request received: " + req.url);
    proxy.web(req, res);
});

const server = http.createServer(app);

server.on('upgrade', function (req, socket, head) {
    proxy.ws(req, socket, head);
});

server.on('connect', async function (req, socket, head) {
    proxy.web(req, socket, head);
});

console.log("Reverse proxy server is running in port 5002");
server.listen(5002);
We’ll use SQLite to create a simple user database for authentication. A few key notes:
Here’s the python code to create the database and insert a few sample values. Feel free to change the credentials to your liking.
create-users.py
import sqlite3

# Connect to SQLite database (or create it if it doesn't exist)
conn = sqlite3.connect("users.db")
c = conn.cursor()

# Create table
c.execute(
    """
    CREATE TABLE users (
        username text,
        password text
    )
"""
)

# Insert sample rows
sample_data = [("user1", "pwd1"), ("user2", "pwd2"), ("user3", "pwd3")]
c.executemany("INSERT INTO users VALUES (?,?)", sample_data)

# Commit the changes
conn.commit()

# Fetch and print all rows
c.execute("SELECT * FROM users")
rows = c.fetchall()
for row in rows:
    print(f"Username: {row[0]}, Password: {row[1]}")

# Close the connection
conn.close()
Keep your main application code in app.py. Here’s a sample that uses info from the basic auth:
app.py
import base64

import streamlit as st
from streamlit.web.server.websocket_headers import _get_websocket_headers

headers = _get_websocket_headers()


def get_username_from_basic_auth(auth_header):
    # Remove "Basic " prefix
    encoded_credentials = auth_header[6:]

    # Decode base64 string
    decoded_credentials = base64.b64decode(encoded_credentials).decode("utf-8")

    # Split on colon and take the first part
    username = decoded_credentials.split(":")[0]

    return username


auth_header = headers.get("Authorization")
username = get_username_from_basic_auth(auth_header)
st.write(f"# Hello, {username}!")

if st.button("Print Message"):
    st.write("Button clicked. Here is your message!")
Now that we’ve set up our reverse proxy and our app, let’s test them! First, create our users.db:
python create-users.py
Then, start the Streamlit app on port 5801:
streamlit run app.py --server.port 8501
In another terminal window, start the reverse proxy:
node server-streamlit-auth.js
Navigate to http://localhost:5002. You should see this:
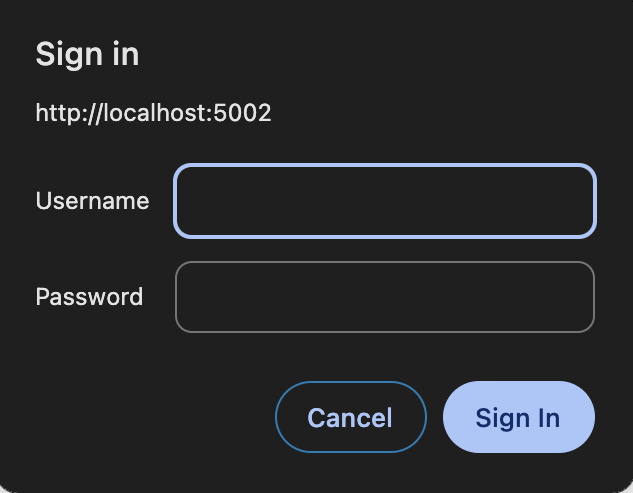
Enter a valid username and password: user1, pwd1. You should be redirected to your app:

There you have it! You’ve built a simple reverse proxy layer to authenticate a Streamlit app using a SQLite database.
Since this is a proof-of-concept meant for demonstration, there are a few issues that make this current example unfit for a production setting:
If you are looking for full-fledged authentication services for your Streamlit app, Ploomber Cloud offers a production-grade authentication mechanism with all the necessary security measures. Email the team at contact@ploomber.io if you want to deploy Streamlit apps securely.
Seamless deployment for data scientists and developers. Ploomber handles infrastructure so you focus on building. Secure and scalable—from personal projects to enterprise apps. Support for Streamlit, Dash, Docker, and AI-powered applications. Because life's too short for deployment headaches.

